
Thursday, May 28, 2009
Wednesday, September 24, 2008
iriver Spinn Unboxing and Preview
 iriver Spinn arrived at my door step the other day directly from Korea. I'm so surprise that the box is so small. I'm even surprise when I see the Spinn itself. It's so petite and cool.
I bought from ebay seller k-gadget. If you want one you can search ebay. Last time I saw there is 2 units available. k-gadget is a nice person and provides good service.
This are the specs of Spinn:
- 3.2-inch WQVGA (480x272) AMOLED touchscreen with haptic feedback (more on this later)
- Spinn Wheeler
- Bluetooth 2.0 for A2DP earphones
- DMB, DAB and FM tuners with recording function
- Video: MPEG4 SP, WMV9 SP, XVID
- SWF (flash lite 2.1)
- Audio: MP3, WMA, OGG, FLAC, ASF
- Photo: JPEG
- Voice recording
- Text viewer
- Battery: 24 hour audio, 5 hour video
- Capacity: 4 or 8 GB
- Expansion Slot: NONE
Here comes the unboxing:
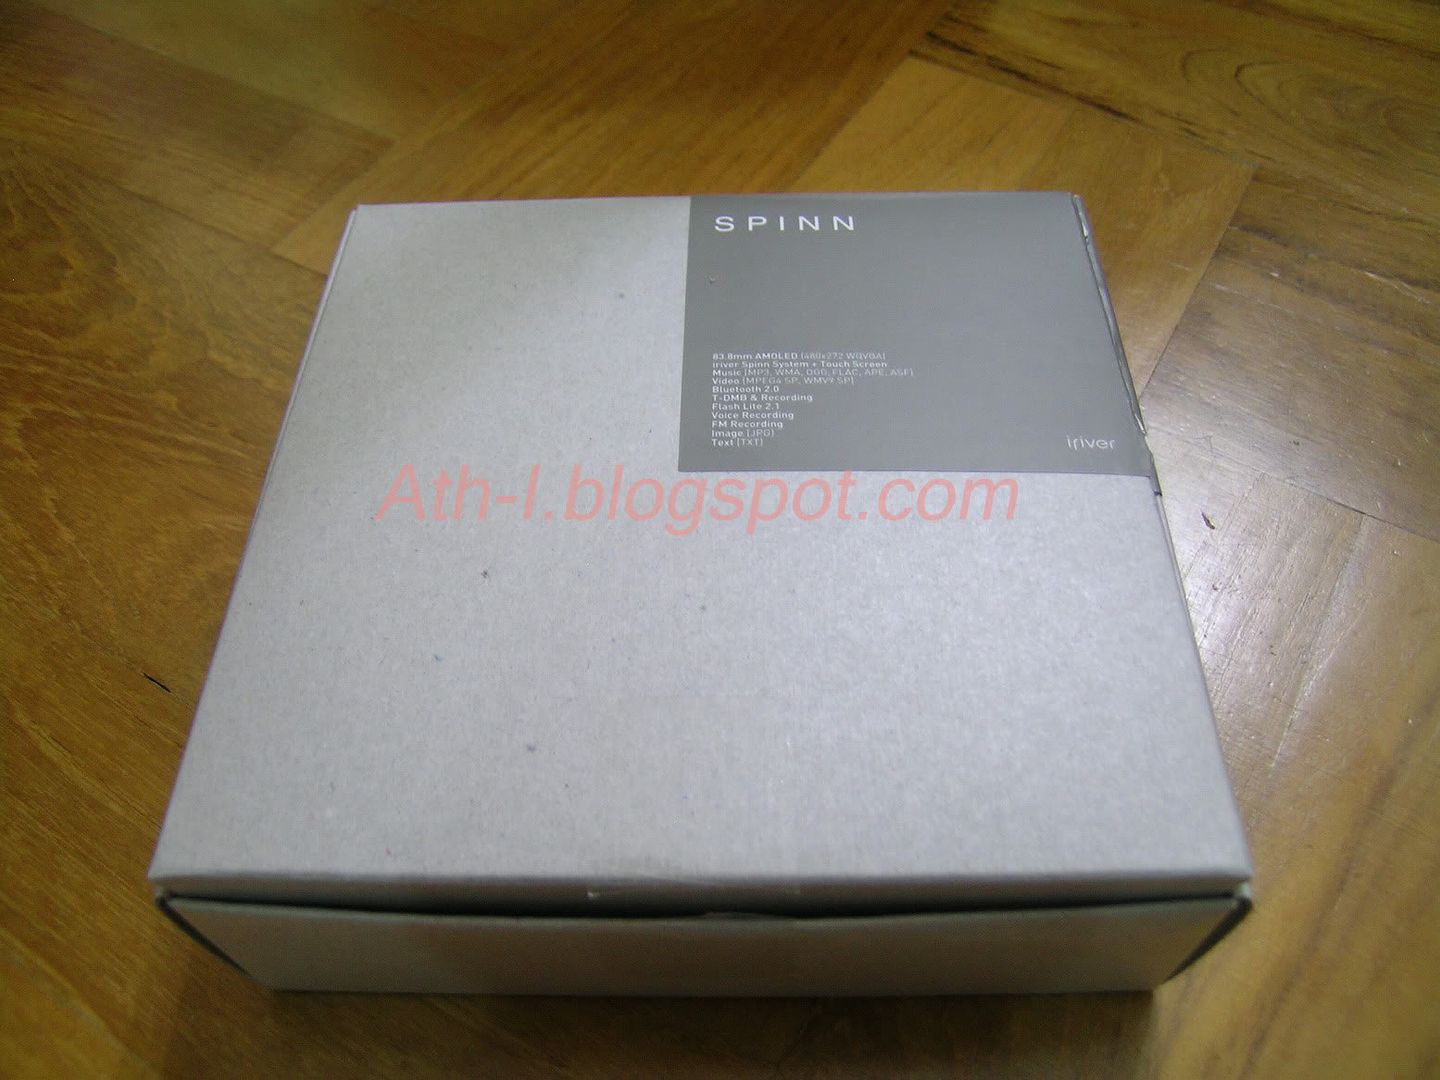 After removing the outer box and bubble wrap reveals a small square box.
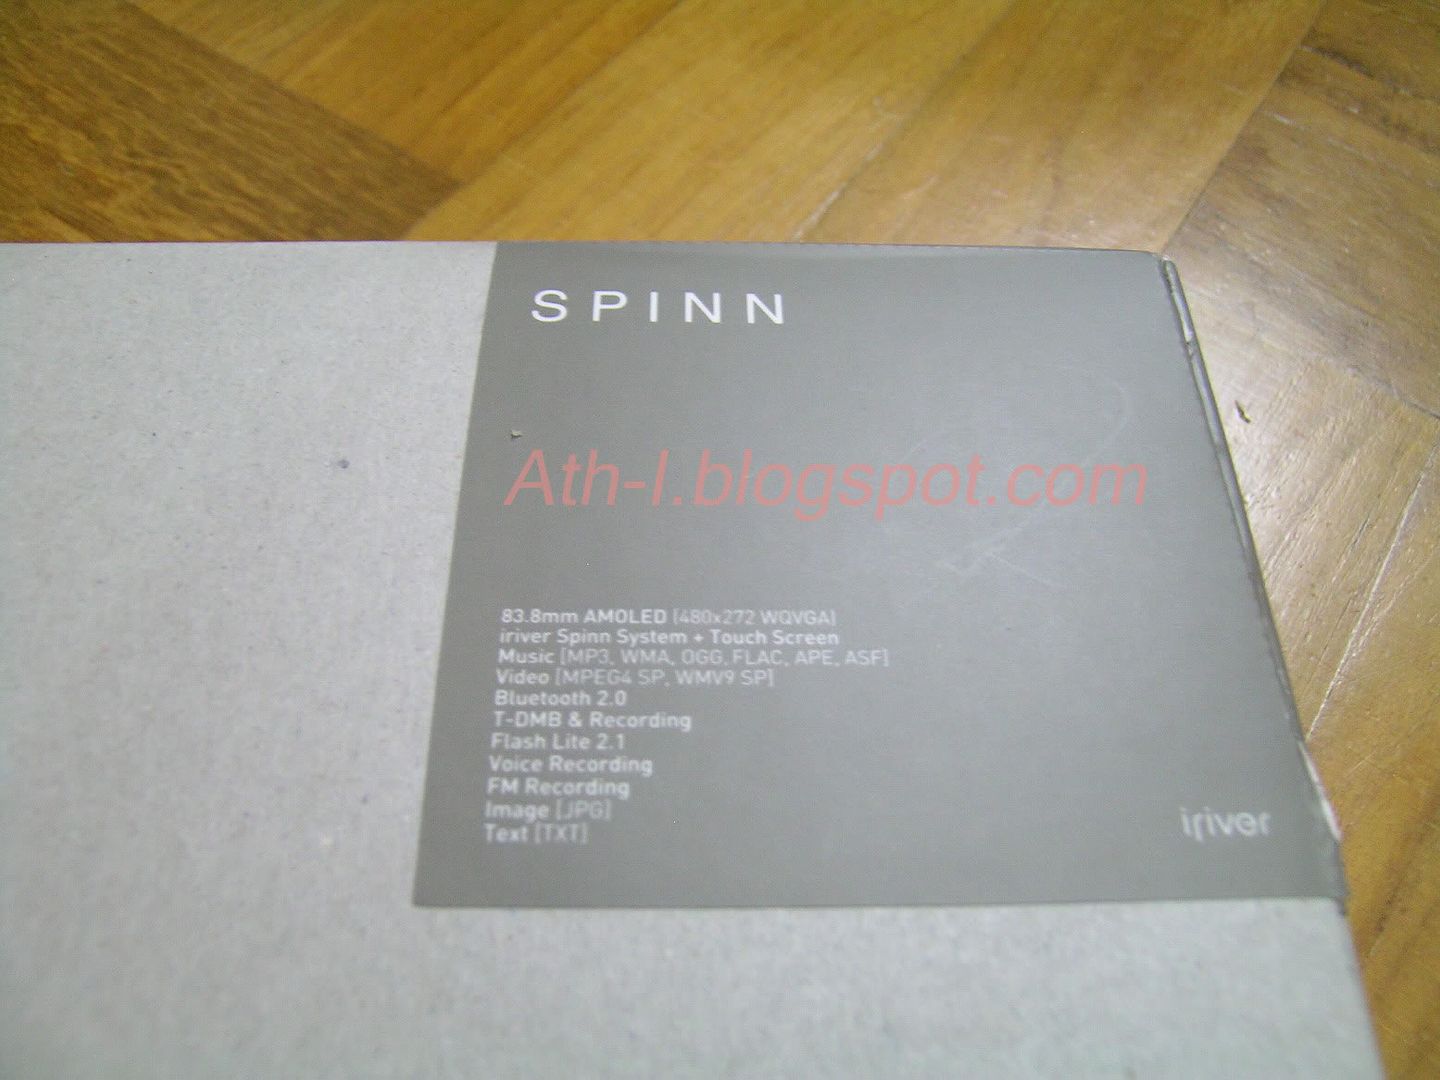 Specs detailed
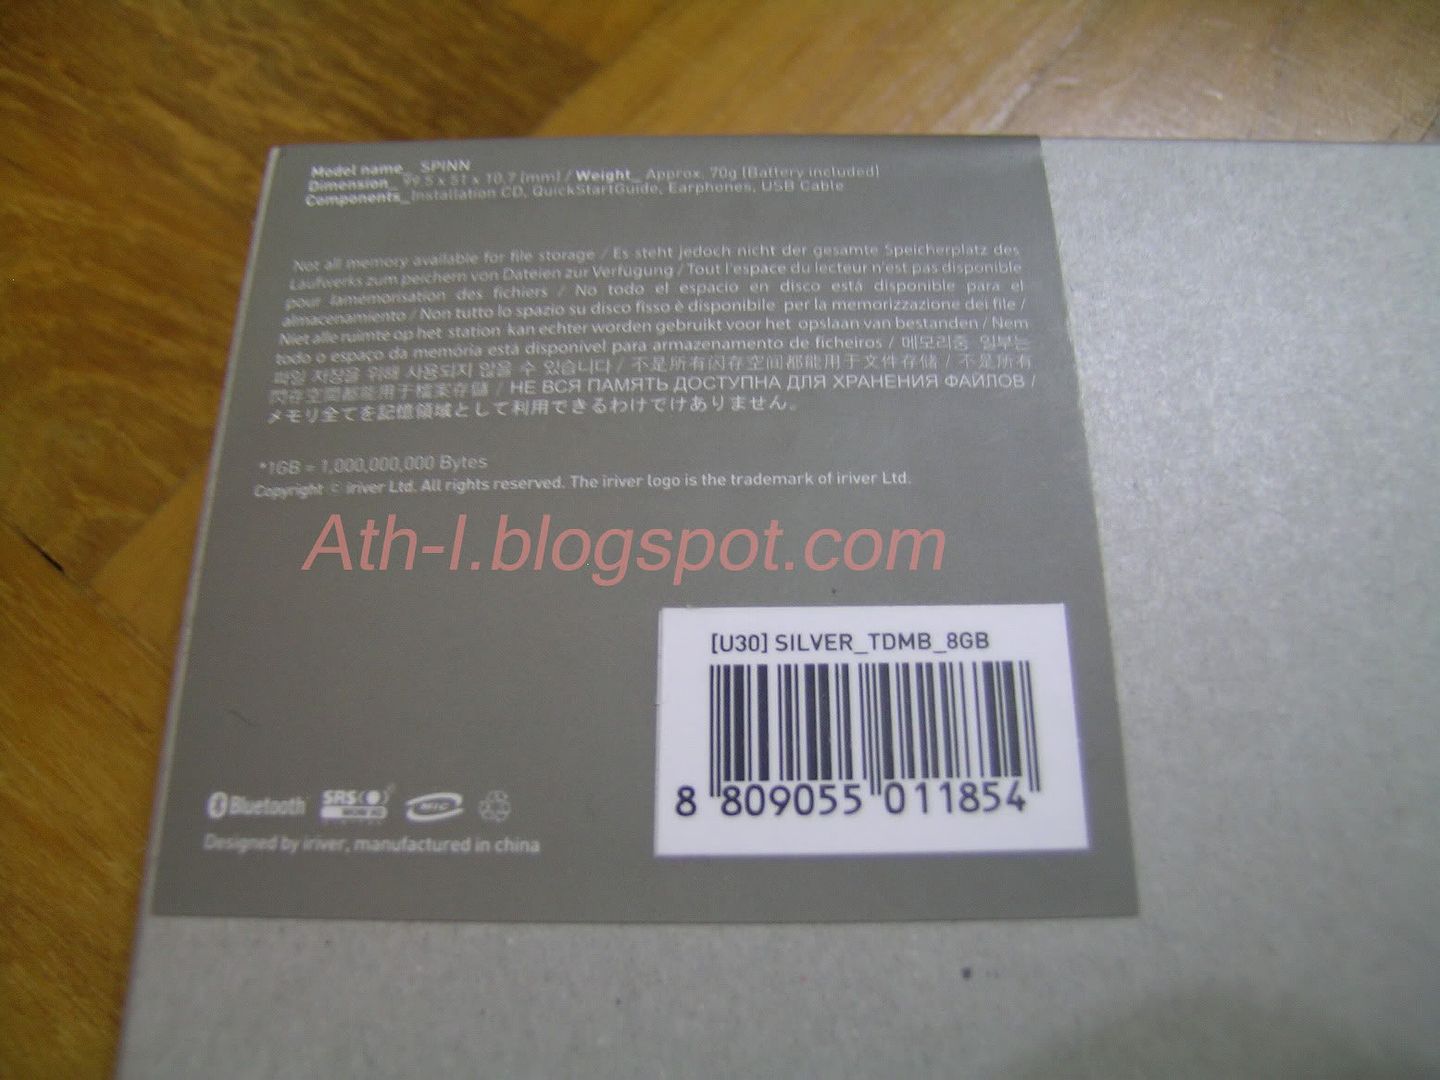
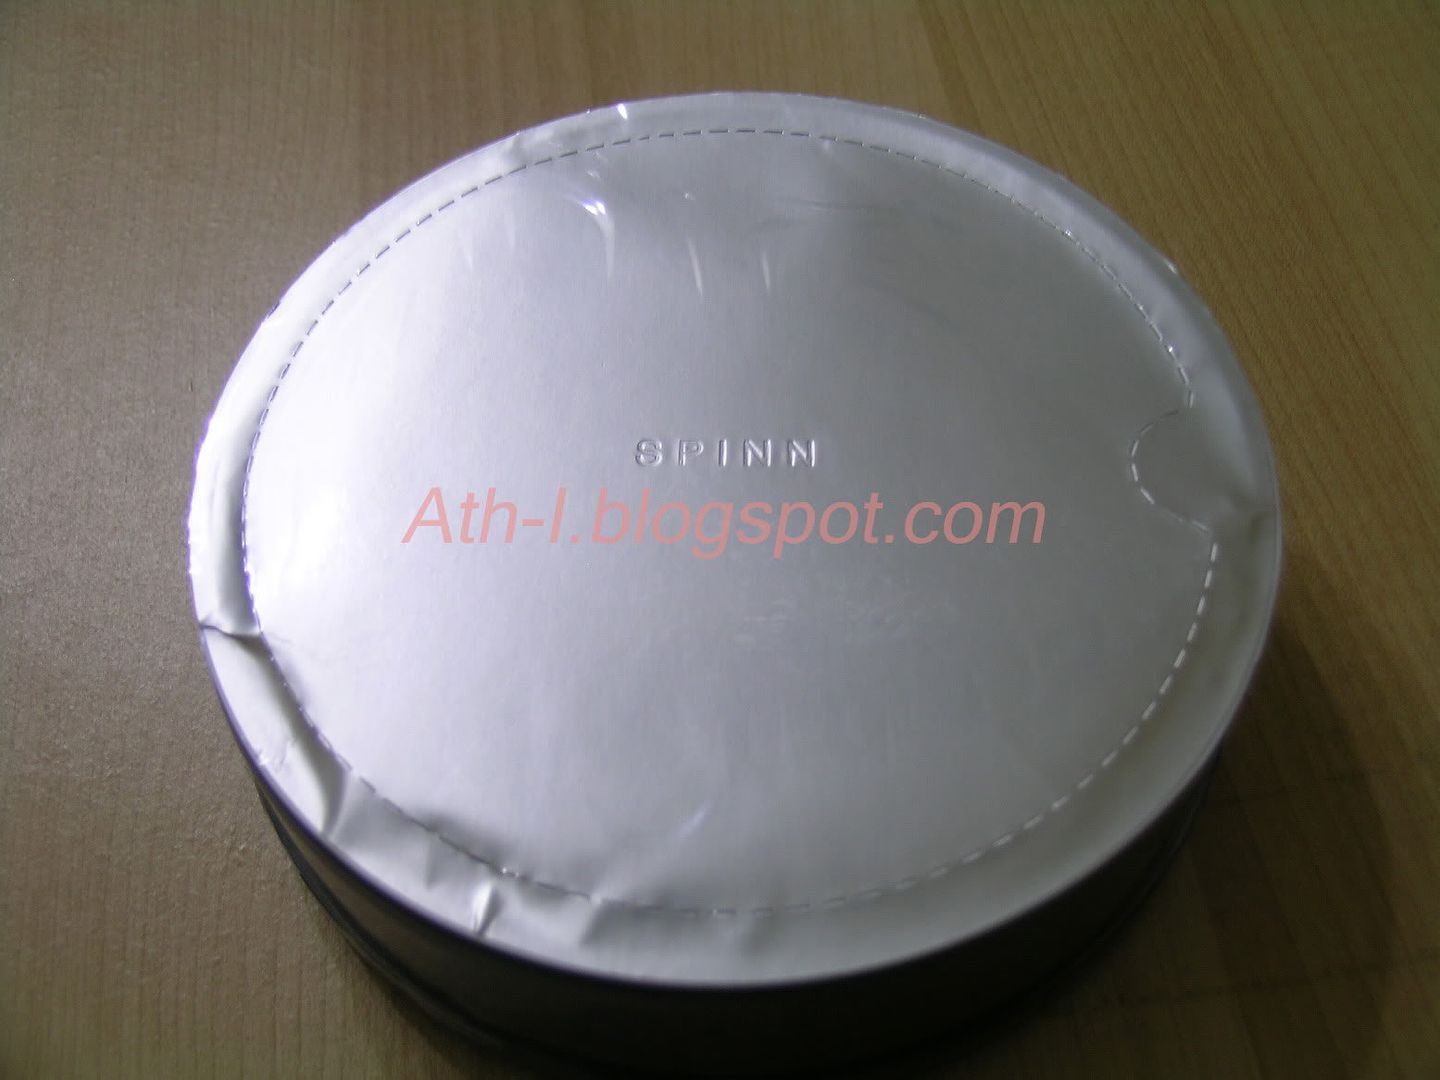
 Inside is a round container made of brushed metal top and thick transparent plastic base
 Brushed metal top.
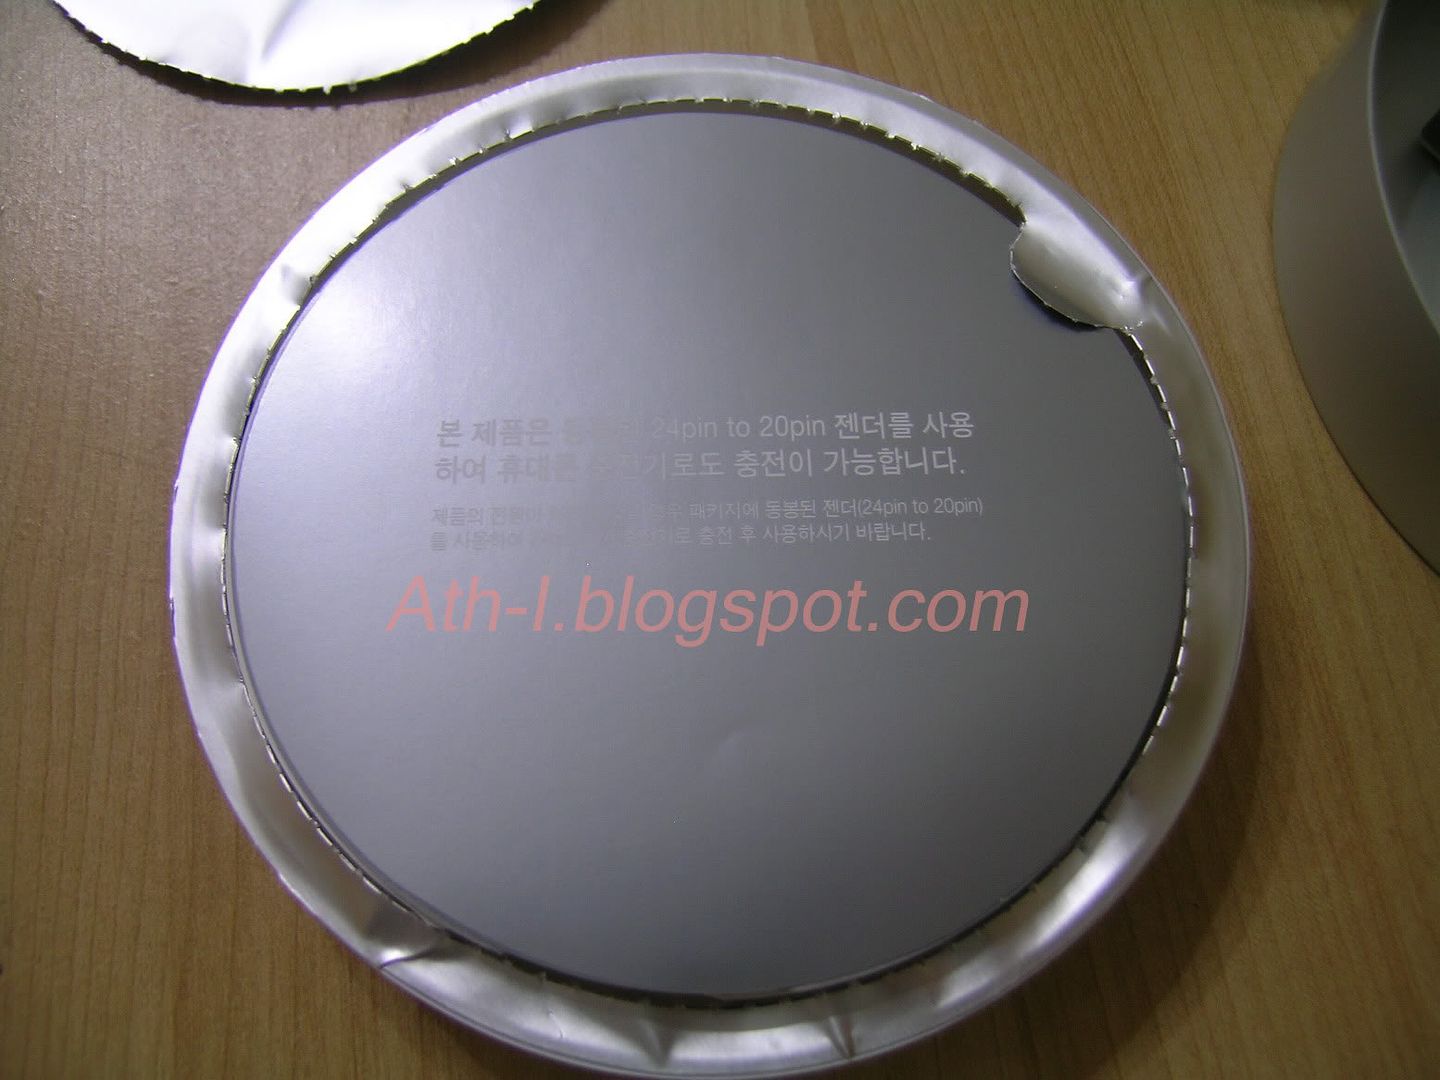
Underside of the container. Detail specs of Spinn including weight.
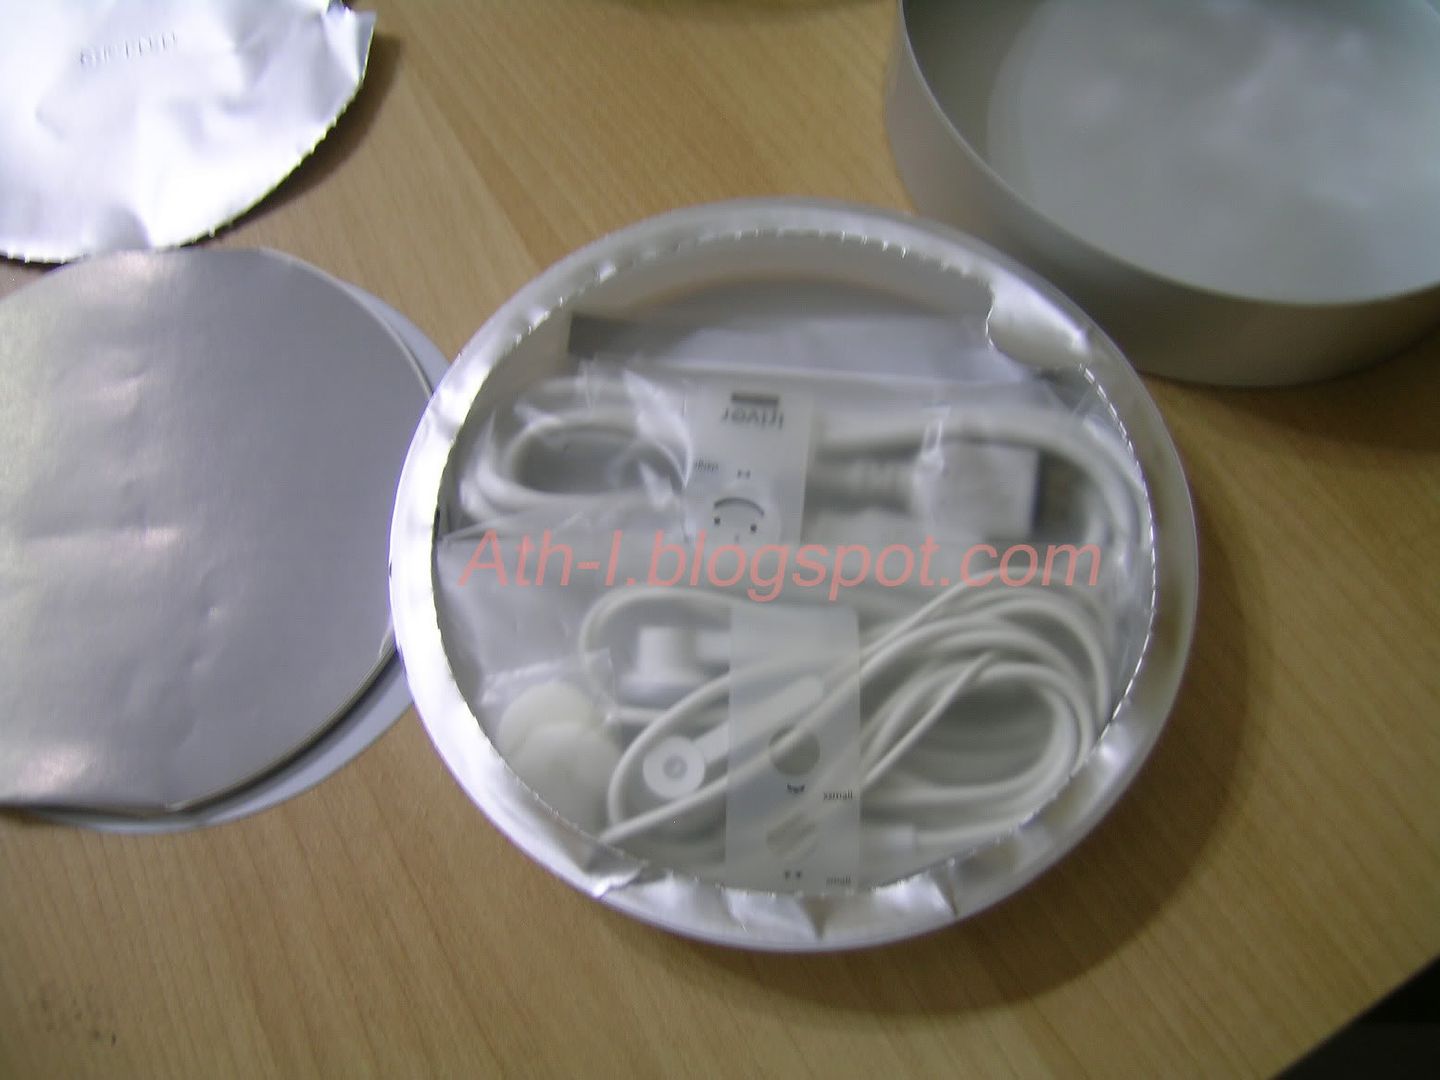
 Container with metal top removed revealing a sealed pack. Inside the pack is USB cable, earphones... (more on that later)
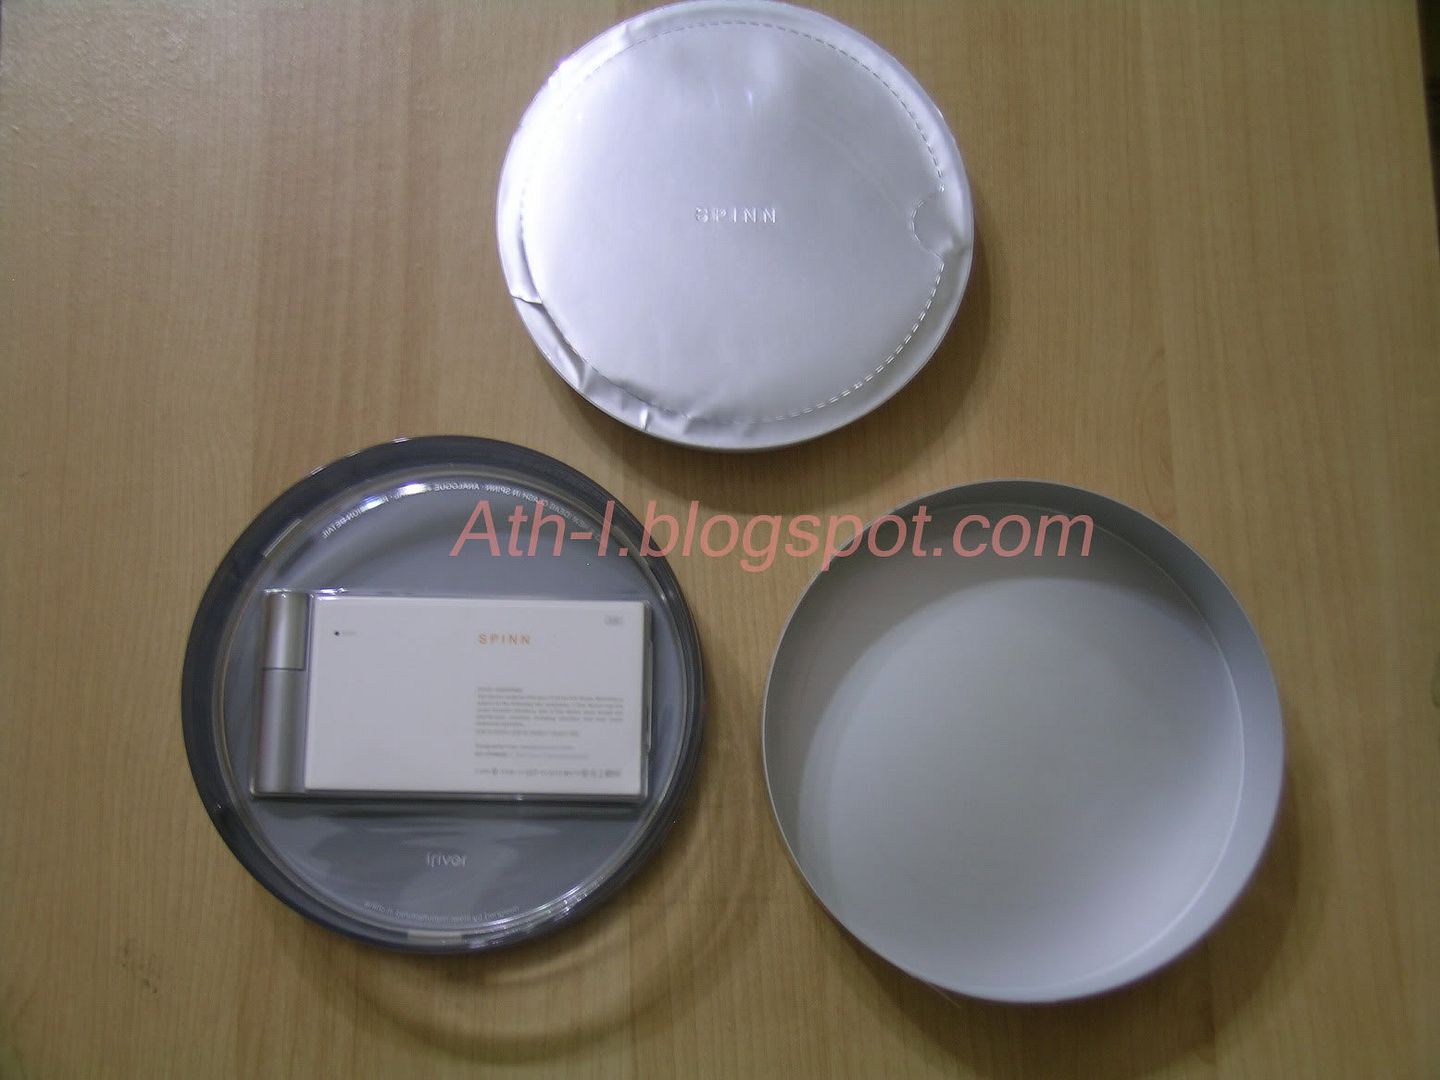 Top: Accessories pack. Bottom left: Spinn inside container. Bottom right: Metal cover.
 Tada! The Spinn! with it's back facing. (serial no. photoshoped)
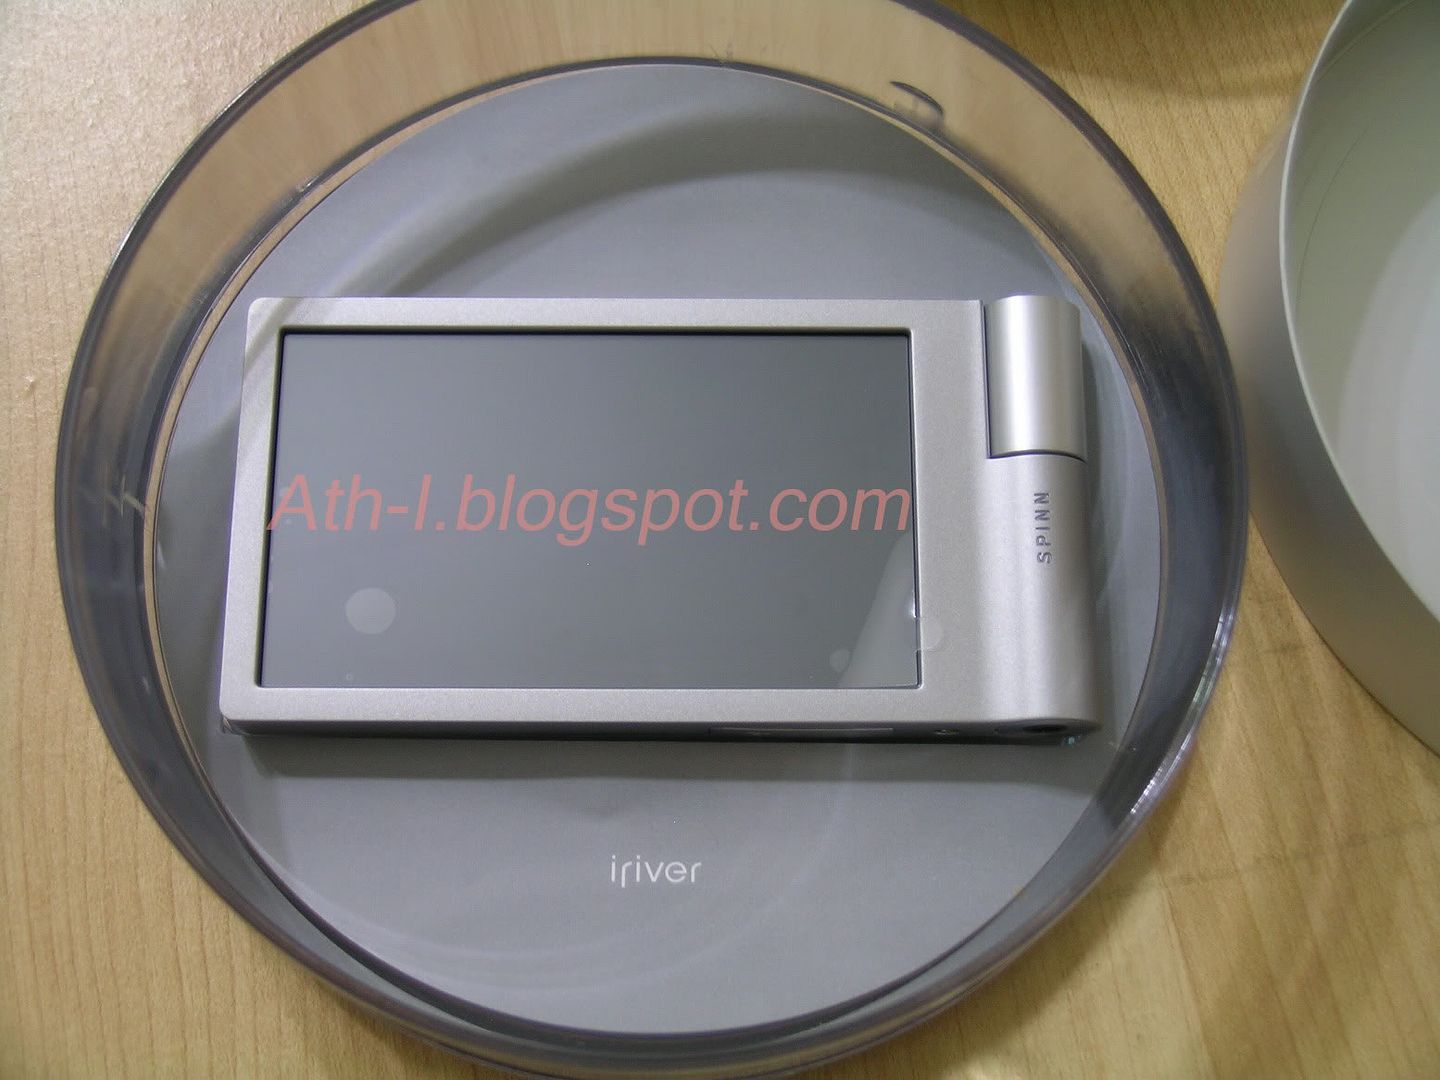 Here comes the beautiful. May I present you the Spinn!
 Spinn with glass-like plastic container in the background
 Accessory pack opened.

 Multi-language connected Quick-start guide.
 Under the quick-start guide are the USB cable and earphones.
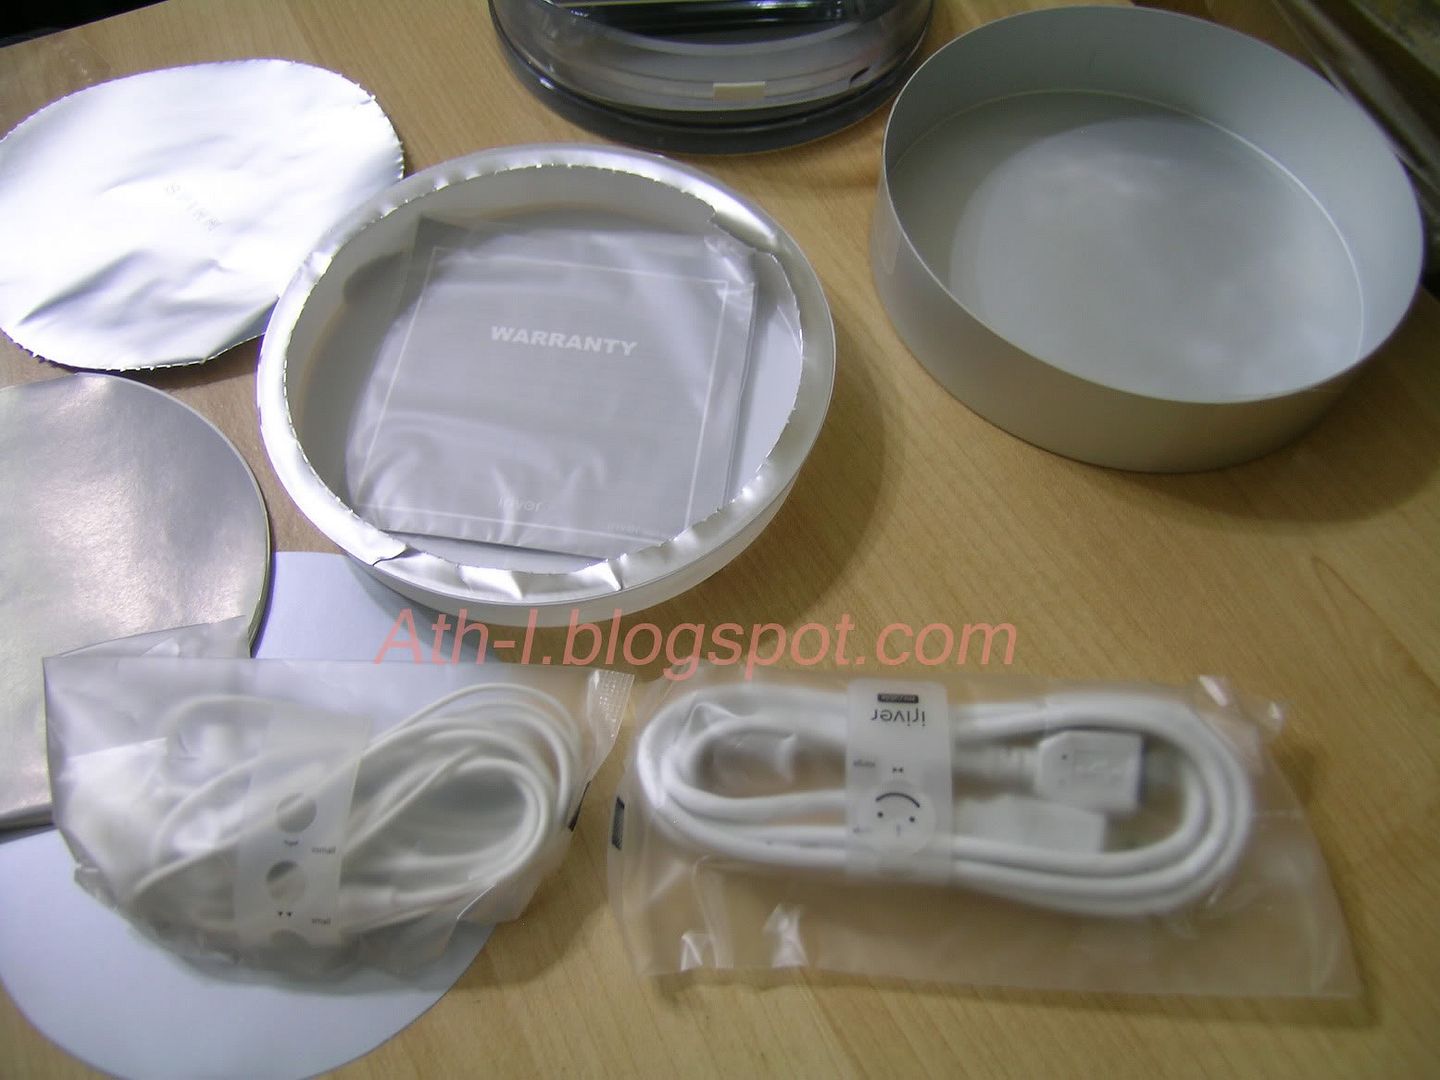 A mini CD and a warranty booklet are at the bottom of accessory pack
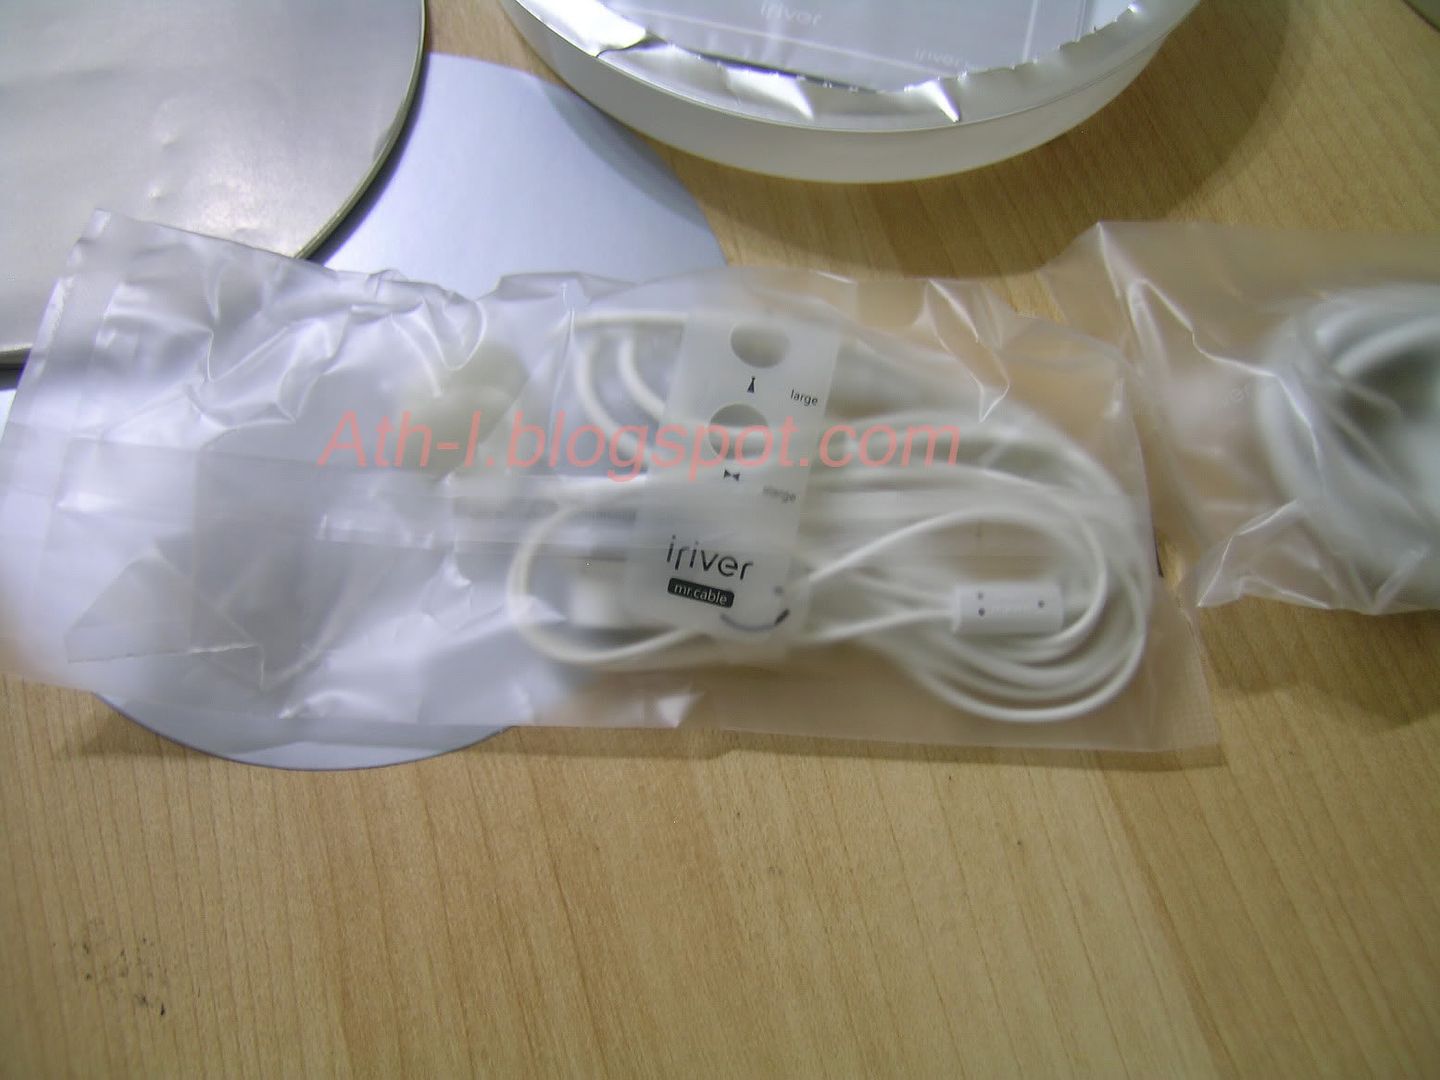
 Both the USB cable and earphones are included with a strap with smiley face.
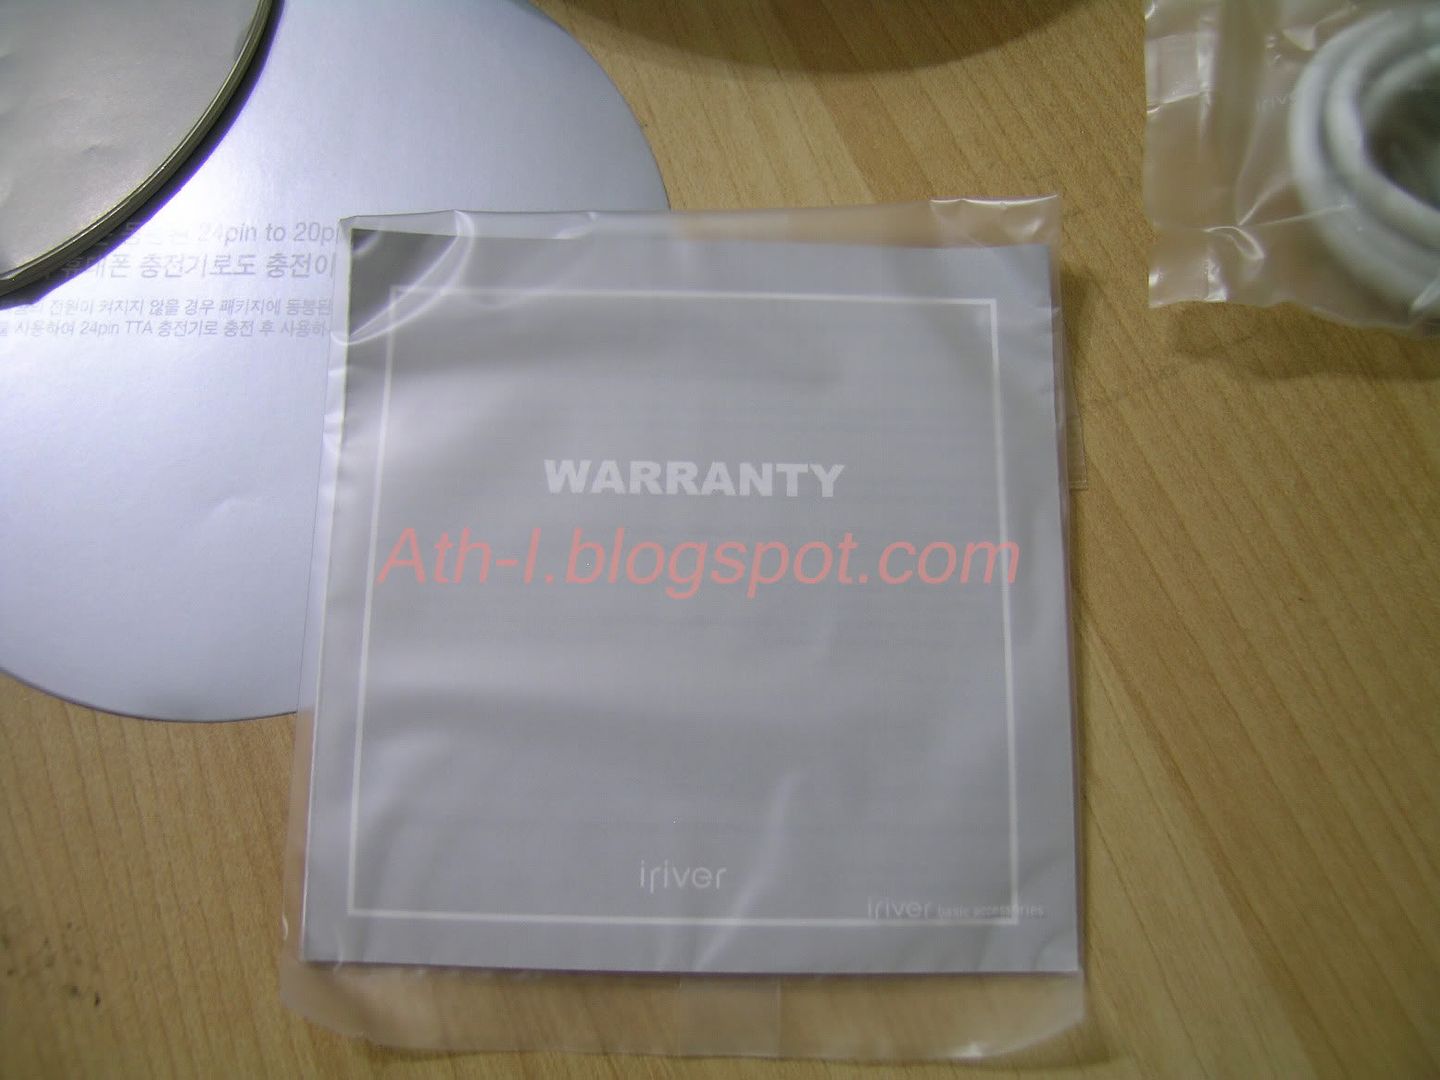 Warranty booklet with mini CD.
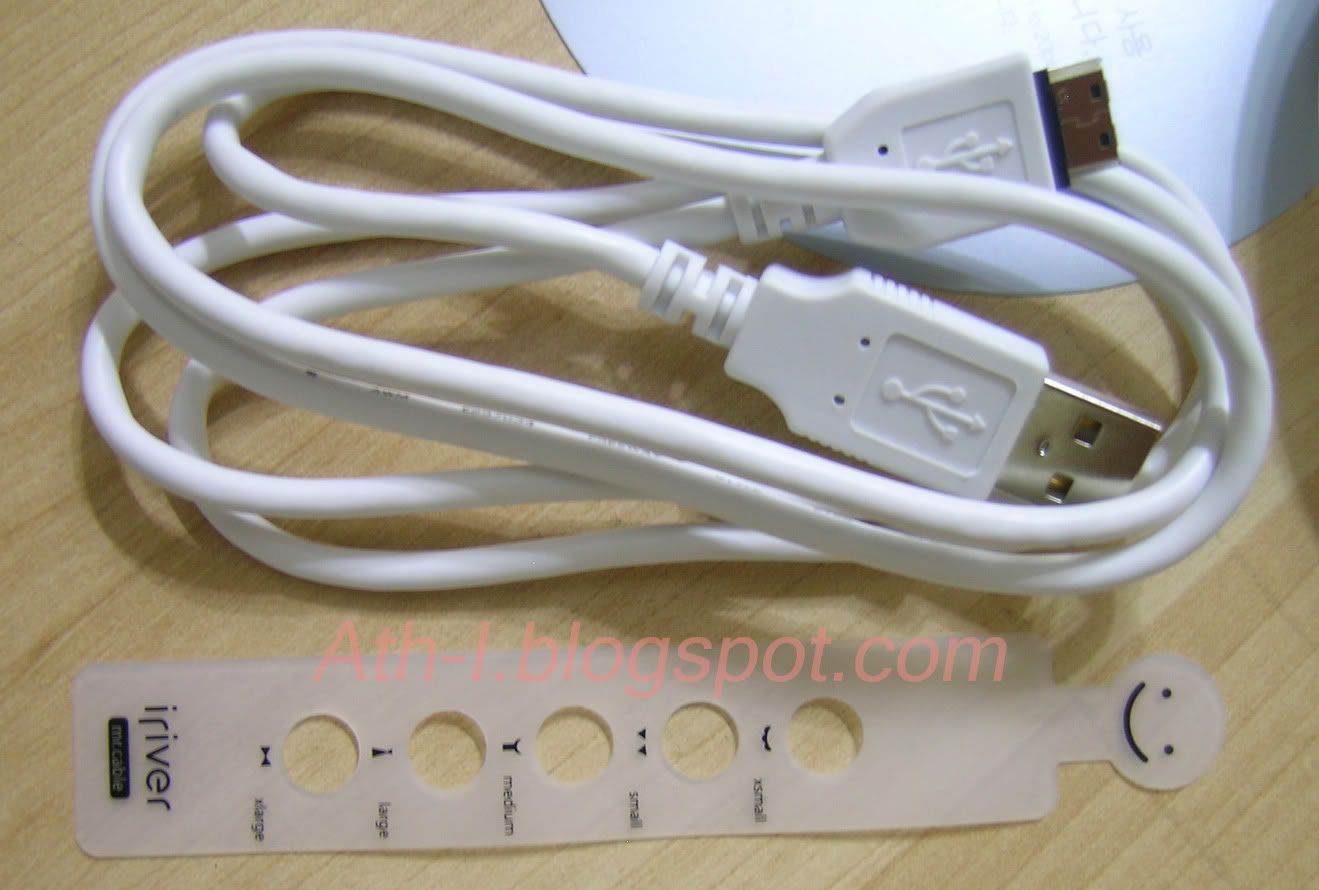 Propriety USB cable with smiley cable wrap.
 Spinn in it's glory!
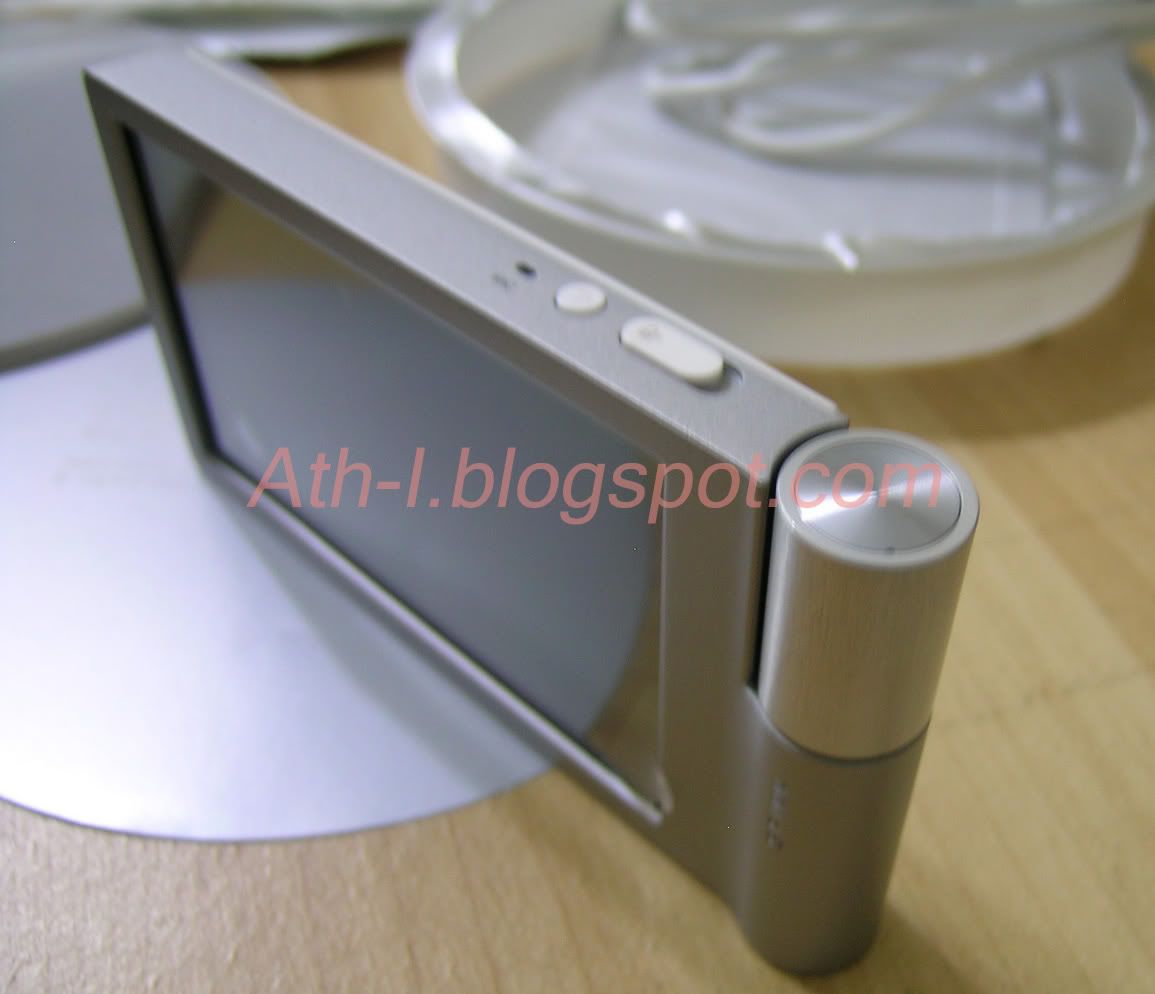
 Top View. Left to right: mic, back button, hold button, spin wheel at the end.
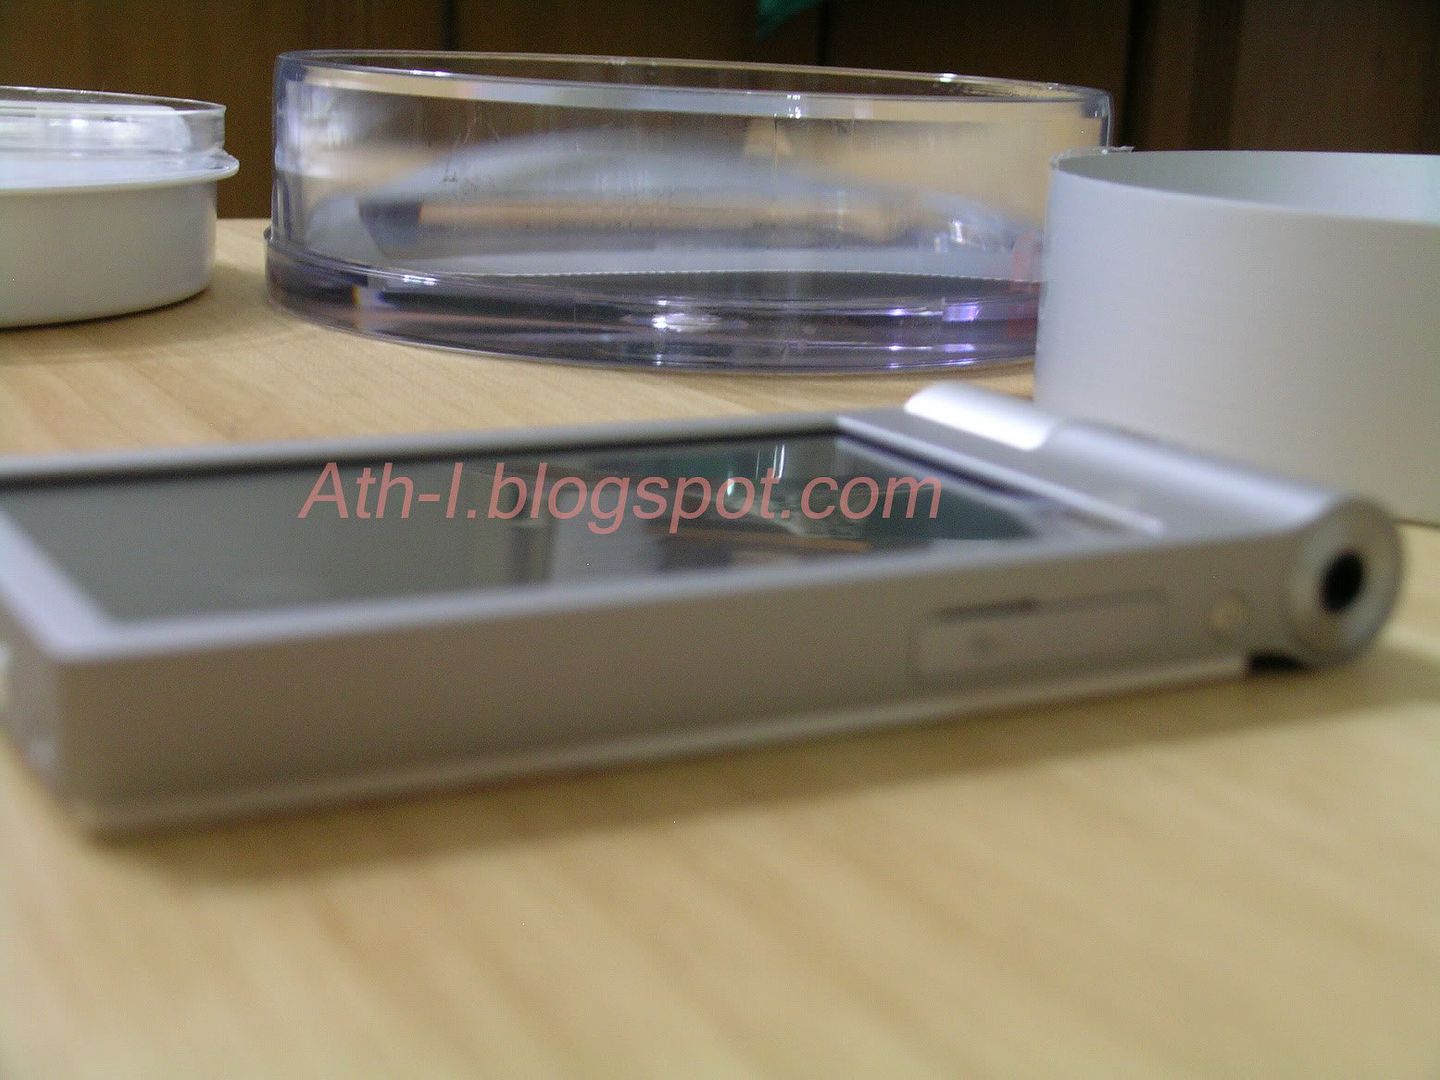
 Bottom view: Propriety USB cable port, 3.5mm audio

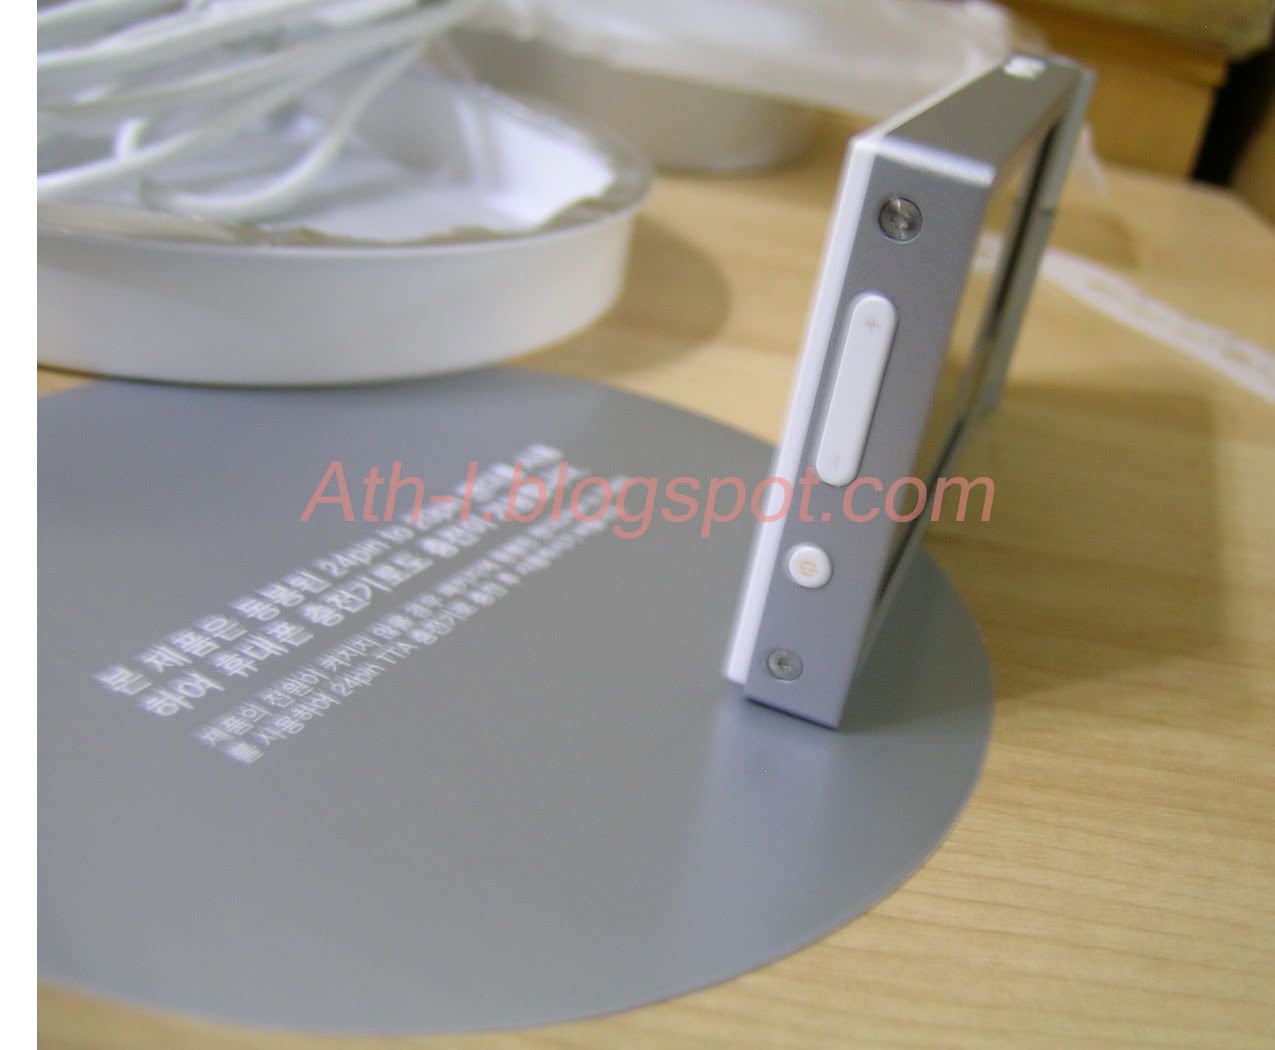 Left side of Spinn. Volume and power button.
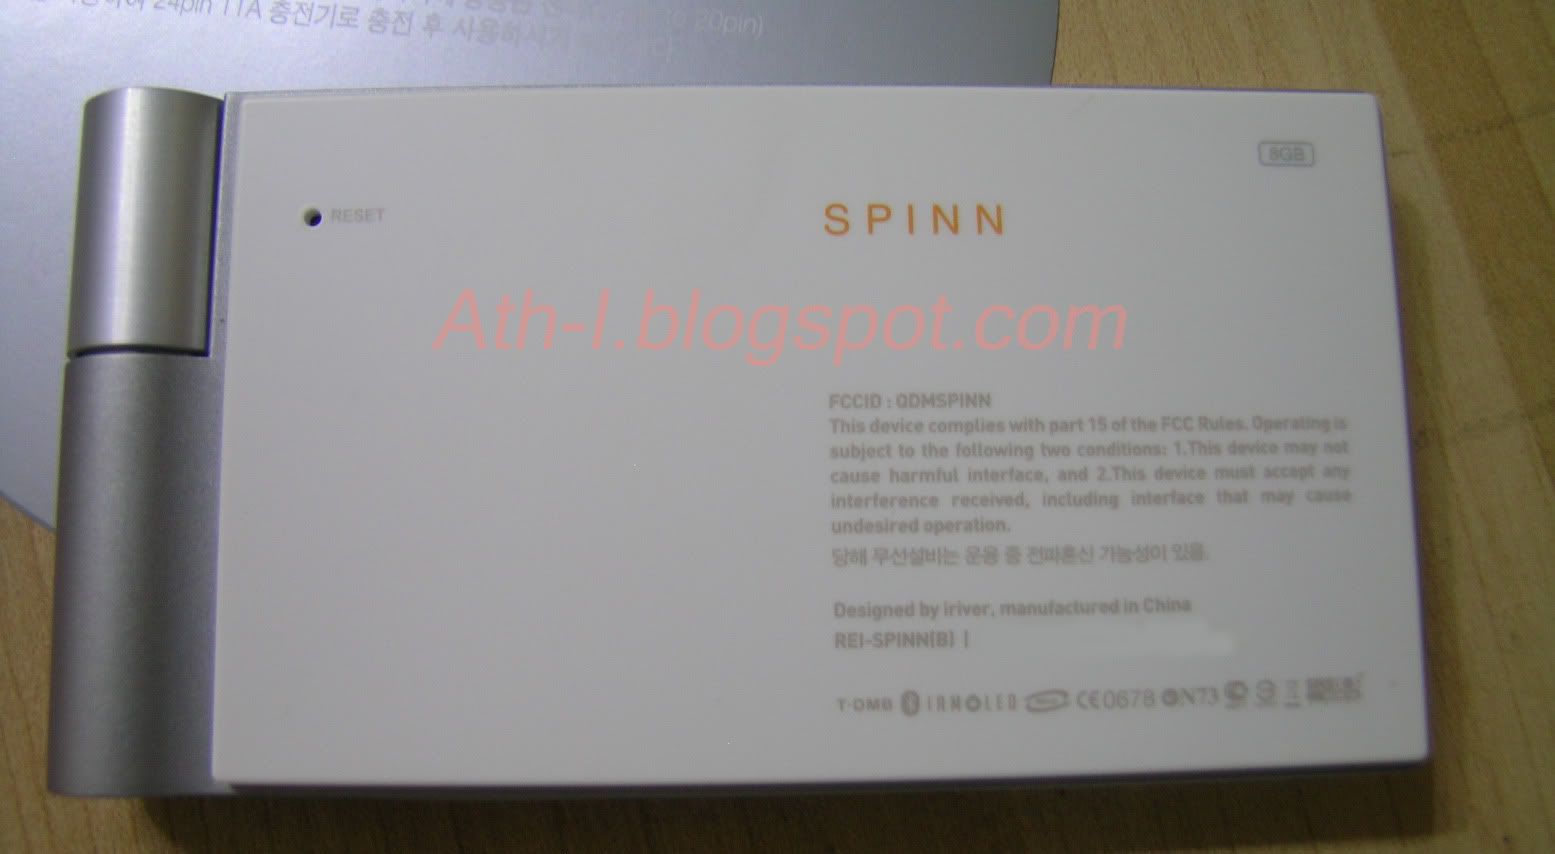 Back of Spinn. Reset hole on upper left.
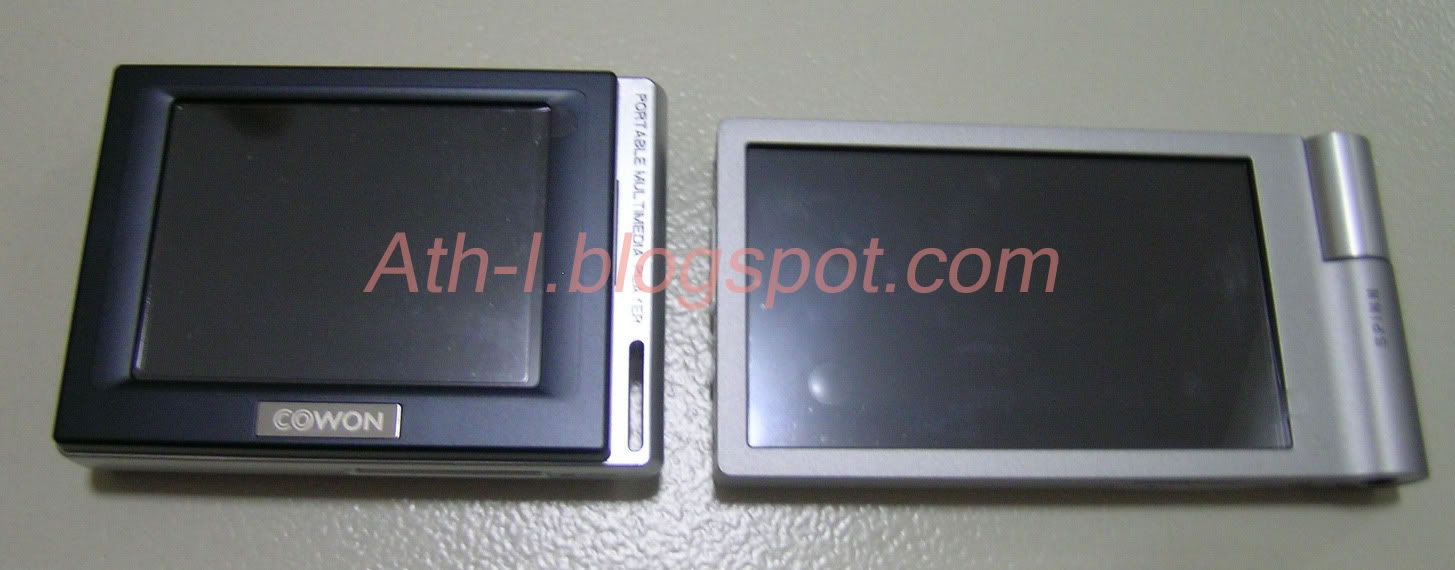 Comparison shot with Cowon D2.
Sound
As music is the main function of Spinn (as well as all irivers) , I have a high expectation in this department. Overall, Spinn doesn't dissapoint at all but still there is a 'gap' from Cowon D2. The clarity is not as good as D2. Fortunately, there is custom EQ and whole lot a options. Further tweaking proves the Spinn is capable of producing very good sound. There are also SRS options but ony the EQ or SRS can be selected at any one time. In fact that's a bless as the SRS is all bull-shit and you don't want to enable it. Spinn is a very good music player and produce good bass and treble(with tweaking of course) but still can't compete with Cowon D2 (although it is unfair to compare it to D2 as D2 has one of the best DAC on board).
Video
Video experience on Spinn is good. The screen has a rich color and the resolution of 480x272 on 3" screen is sharp. As stated in the specs, Spinn supports MPEG4 SP and WMV9 SP. I haven't really tried it but I loaded one XVID video with 720x384 and it plays it albeit very laggy with skipped frames. So I convert it into 480x270 XVID and it plays nicely. Its screen is nice and sufficient for watching videos/movies without subtitle (you know, too small to read).
Interface
The interface is teamed as an anolog radio dial which you can adjust by turning the spin knob. To select just click the knob. This is something new. Of course touch screen is on board as well, as without touch screen nowdays is like 'you're from last decade'. Haptic feedback is included. It means it gives you a feedback by vibrating when you touch-select something on the screen. It is disabled to save energy when battery is running low, well-thought of. Another nice touch is to delete a file, you just drag it into a 'trash can', no menu here.
Extras
FM radio with recording and voice recording is included. Spinn can read txt files as well. Viewing photo is OK but wasted space on both left and right most of the time as Spinn employed a wide screen. One more selling features is the Spinn is equipped with bluetooth! It is only used for A2DP bluetooth earphones. DMB is useless outside of Korea but it's one of the features. Together with the Spinn, iriver plus 3 (on mini CD) is used for converting and transfering media files into Spinn. It is not needed for transfering media filed into Spinn to be playable. You can just 'drag and drop'.
Conclusion
iriver Spinn is a very nice looking player and very good music player. It's small and light and the build quality is superb. It's nice to have albeit the price is on the higher side. Currently it's only available in Korea, so if you have one in your hand it will surely attract some attentions. It is definitely a better media player than the ipod if you don't use DRM music (by the way, only idiots will buy DRM music).
Pros:
Nice screen
Music format supported (ogg, flac)
Video format supported (MPEG4, XVID, WMV9)
'Drag n drop' feature
Haptic feedback
Nice intuitive interface
Cons:
Small screen
Useless SRS
No memory expansion slot
Propriety USB cable (don't ever lose it!)
No wall socket adaptor included, charged through USB port only
Container with metal top removed revealing a sealed pack. Inside the pack is USB cable, earphones... (more on that later)Top: Accessories pack. Bottom left: Spinn inside container. Bottom right: Metal cover.Tada! The Spinn! with it's back facing. (serial no. photoshoped)Here comes the beautiful. May I present you the Spinn!Spinn with glass-like plastic container in the backgroundAccessory pack opened.Multi-language connected Quick-start guide.Under the quick-start guide are the USB cable and earphones.A mini CD and a warranty booklet are at the bottom of accessory packBoth the USB cable and earphones are included with a strap with smiley face.Warranty booklet with mini CD.Propriety USB cable with smiley cable wrap.Spinn in it's glory!Top View. Left to right: mic, back button, hold button, spin wheel at the end.Bottom view: Propriety USB cable port, 3.5mm audioLeft side of Spinn. Volume and power button.Back of Spinn. Reset hole on upper left.Comparison shot with Cowon D2.Sound
As music is the main function of Spinn (as well as all irivers) , I have a high expectation in this department. Overall, Spinn doesn't dissapoint at all but still there is a 'gap' from Cowon D2. The clarity is not as good as D2. Fortunately, there is custom EQ and whole lot a options. Further tweaking proves the Spinn is capable of producing very good sound. There are also SRS options but ony the EQ or SRS can be selected at any one time. In fact that's a bless as the SRS is all bull-shit and you don't want to enable it. Spinn is a very good music player and produce good bass and treble(with tweaking of course) but still can't compete with Cowon D2 (although it is unfair to compare it to D2 as D2 has one of the best DAC on board).
Video
Video experience on Spinn is good. The screen has a rich color and the resolution of 480x272 on 3" screen is sharp. As stated in the specs, Spinn supports MPEG4 SP and WMV9 SP. I haven't really tried it but I loaded one XVID video with 720x384 and it plays it albeit very laggy with skipped frames. So I convert it into 480x270 XVID and it plays nicely. Its screen is nice and sufficient for watching videos/movies without subtitle (you know, too small to read).
Interface
The interface is teamed as an anolog radio dial which you can adjust by turning the spin knob. To select just click the knob. This is something new. Of course touch screen is on board as well, as without touch screen nowdays is like 'you're from last decade'. Haptic feedback is included. It means it gives you a feedback by vibrating when you touch-select something on the screen. It is disabled to save energy when battery is running low, well-thought of. Another nice touch is to delete a file, you just drag it into a 'trash can', no menu here.
Extras
FM radio with recording and voice recording is included. Spinn can read txt files as well. Viewing photo is OK but wasted space on both left and right most of the time as Spinn employed a wide screen. One more selling features is the Spinn is equipped with bluetooth! It is only used for A2DP bluetooth earphones. DMB is useless outside of Korea but it's one of the features. Together with the Spinn, iriver plus 3 (on mini CD) is used for converting and transfering media files into Spinn. It is not needed for transfering media filed into Spinn to be playable. You can just 'drag and drop'.
Conclusion
iriver Spinn is a very nice looking player and very good music player. It's small and light and the build quality is superb. It's nice to have albeit the price is on the higher side. Currently it's only available in Korea, so if you have one in your hand it will surely attract some attentions. It is definitely a better media player than the ipod if you don't use DRM music (by the way, only idiots will buy DRM music).
Pros:
Nice screen
Music format supported (ogg, flac)
Video format supported (MPEG4, XVID, WMV9)
'Drag n drop' feature
Haptic feedback
Nice intuitive interface
Cons:
Small screen
Useless SRS
No memory expansion slot
Propriety USB cable (don't ever lose it!)
No wall socket adaptor included, charged through USB port only
Sunday, June 8, 2008
Upgrade Factory-installed Vista to Ultimate for Free
DISCLAIMER: I DO NOT PROMOTE OR SUPPORT ANY KIND OF PIRACY OF COPYRIGHTED MATERIAL OR CONTENTS. THIS IS JUST ANOTHER PROVE OF CONCEPT OF MINE. AND I AM NOT RESPONSIBLE FOR ANY LEGAL ISSUES YOU ENCOUNTER IF YOU FOLLOW THE BELOW GUIDES/INSTRUCTIONS. I AM NOT RESPONSIBLE OF ANY OUTCOME, LOST OF DATA OR ANY DAMAGES RESULTED DUE TO THE ACT OF YOU PROCEEDING WITH BELOW GUIDES/INSTRUCTIONS. ALL THE TRADEMARKS AND COPYRIGHTS ARE THE RIGHTS OF THE RESPECTIVE OWNERS.
Introduction
When Vista first came out, the first hack is the 30-grace period hack. You can actually try Vista of any version for 30 days without needing it to be activated and still can download all Windows Updates. So some crackers make use of this ‘feature’ to stop this 30-day countdown. So the time left for trial is always 30 days (you can use all features like Windows Update without any restriction).
After some time this hack is out do by better Paradox activation. This hack is actually making use of the way the major computer makers (Dell, HP, Asus, Acer…) activate Vista.
*Paradox does not work with Vista SP1 . But other Activator such as this one will work.
Quote from Paradox:
“Microsoft allows large hardware manufacturers to ship their products containing a Windows Vista installation that does NOT require any kind of product activation as this might be considered an unnecessary inconvenience for the end-user. Instead these so-called 'Royalty OEMs' are granted the right to embed certain license information into their hardware products, which can be validated by Windows Vista to make obtaining further activation information (online or by phone) obsolete. This mechanism is commonly referred to as 'SLP 2.0' ('system-locked pre-installation 2.0') and consists of the following three key elements:
1.The OEM's hardware-embedded BIOS ACPI_SLIC information signed by Microsoft.
2. A certificate issued by Microsoft that corresponds to the specific ACPI_SLIC information. The certificate is an XML file found on the OEM's installation/recovery media, usually called something like 'oemname.xrm-ms'.
3. A special type of product key that corresponds to the installed edition of Windows Vista. This key can usually be obtained from some installation script found on the OEM's installation/recovery media or directly from a pre-installed OEM system.
If all three elements match Windows Vista's licensing mechanism considers the given installation a valid system-locked pre-activated copy (that does not require any additional product activation procedures).
So the basic concept of the tool at hand is to present any given BIOS ACPI_SLIC information to Windows Vista's licensing mechanism by means of a device driver. In combination with a matching product key and OEM certificate this allows for rendering any system practically indistinguishable from a legit pre-activated system shipped by the respective OEM.”
Definition
OEM
The term, OEM (original equipment manufacturer) refers to companies that make products for others to repackage and sell. Resellers buy OEM products in bulk, minus the costly retail packaging that comes with individually sold units. The product itself is essentially the same as its more expensive, retail-packaged sibling. OEM products are used in many industries, but are perhaps most prevalent in electronics.
Generally, dealers of OEM products add something of value before reselling the merchandise. An OEM vendor that does this is known as a "value added reseller" (VAR). A VAR might build components, sub-systems, or systems from quality OEM parts. OEM goods allow VARs a wide range of creative marketing choices, which permits smaller dealers to be competitive in the marketplace.
OEM software will have different product numbers than retail packages, and support may be provided by the VAR, rather than the maker of the software. Functionally, OEM and retail versions of software should be essentially the same.
Two kinds of OEM Product Keys:
· EM SLP Keys
o OEM SLP (System-Locked Pre-installation) keys are only issued to the big manufacturers such as Dell, Asus, Sony, etc.
o These are the only keys that are able to bypass activation that is, perform offline activation without contacting Microsoft.
o They will work with any OEM SLP system, regardless of the OEM system's brand i.e. Product Keys are not brand specific.
· EM NONSLP Keys
o Similar to Retail, but distributed and supported by an OEM. Needs activation by phone or online and they are not brand specific.
· EM COA Keys
o OEM COA keys (Certificate of Authentication) are regular OEM keys that require activation, either by phone or online and they are not brand specific. You will find the sticker with the key underneath you Laptop or on the side of you PC.
o These keys will work in general same as Retail or Upgrade keys and can be used only once.
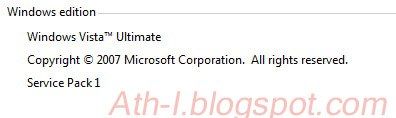
*Basically, most of the laptops/desktops are shipped with OEM COA keys (the sticker at the base) and activated with OEM SLP Keys. The users need not to activate themselves as it is already activated. It means the key in windows is different from the COA label on the bottom.
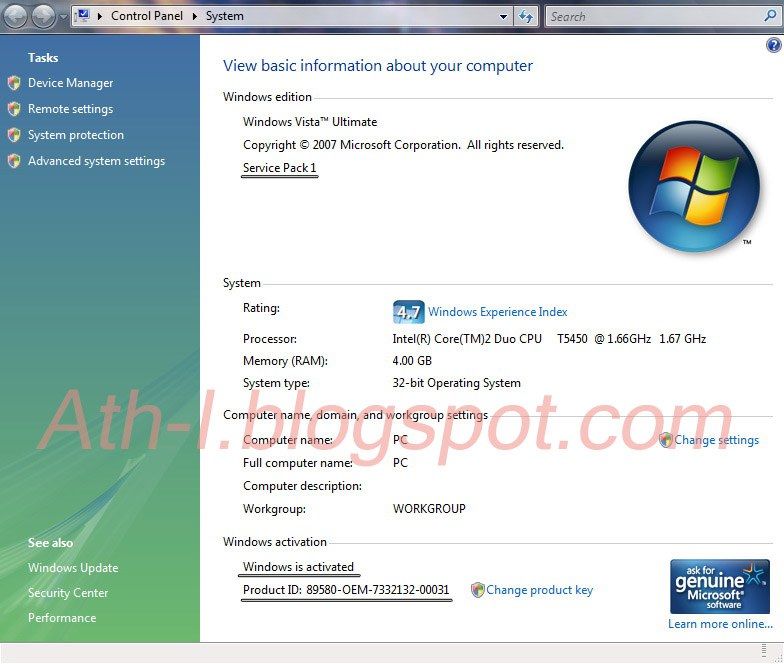 Notice that the Product ID has OEM on it. It's factory activated.
Along Came an Idea
So at first I tried just updating the key using slmgr.vbs -ipk but it won't work. So I think maybe need to reinstall so I proceed with it and voila, It works!
*"Why this guide is useful?" and "Why not just use any activator that is available on the internet?" you might ask.
The answer is that all the activator (including Paradox) will install some emulation driver that emulate a fake BIOS to fool the Vista activation check. Yes this is indeed needed in those without OEM's BIOS ACPI_SLIC. But since most of the laptop have this already and installing this emulator is redundant and might slow down Windows startup time.
The Key Elements to activate Vista Offline
1. OEM SLP Product Key that matches the version of Windows Vista you have installed or are going to install. (Home Basic, Home Premium, Business or Ultimate). It does not have to match the OEM-brand certificate nor the OEM-brand BIOS ACPI_SLIC information.
2. OEM-branded BIOS ACPI_SLIC (can be emulated, there is various driver-based emulator. It’s in your ‘branded’ laptop/desktop)
3. OEM certificate matching the SLIC table. It needs to match are the OEM-branded certificate and the OEM-branded BIOS ACPI_SLIC information.
When 1+2+3 = Vista Activated Offline
OEM SLP Key + OEM Certificate + Full SLIC Table = Vista Activated Offline
If one (1, 2 or C) is missing, activation will fail!
Here’s how you ‘Upgrade’ your Factory-Installed Vista to Ultimate:
Items needed:
1. Laptop/PC by major maker (Dell, HP, Lenovo, Toshiba, Acer, Asus…) with preinstalled with Vista.
a. Note: This can also be machines with no OS install as long as it is by major maker AND that the same model with Vista installed is existed. Example will be those that can be customized with other OSes (Vista, XP, Ubuntu…). Most likely Dell Machines. This is not Upgrade and need to be Custom installation.
2. Full Vista installation DVD (32 bit or 64 bit)
a. IMPORTANT: This is the installation disc and NOT recovery disc. Can be downloaded here (not my links). It is legal to download or providing links to download as long as no Key is provided.
3. Vista Ultimate SLP Key (included in Paradox activator)
4. OEM Certificate – needed only when doing clean install. It’s included in the Paradox activator. Or alternatively can be copy from Vista-preinstalled Laptop/PC by respective major maker. Try search for “*.xrm-ms” in “C:\Windows” folder and remember to search hidden and system files as well. NOT NEEDED for preinstalled one.
Before proceed with upgrading, please be noted that only certain version can be upgraded to Ultimate.
You need to select “Upgrade” and not “Custom” or else you’ll end up with clean install (more on this later). “Upgrade” will only be enabled if:
1. There is > 11GB in C: drive
2. Only from a cheaper version to a more expensive version. It is not possible to downgrade without clean install. For example:
a. Home Basic to Home Premium
b. Home Basic to Bussiness
c. Home Basic to Ultimate
d. Home Premium to Bussiness
e. Home Premium to Ultimate
f. Bussiness to Ultimate
3. Only upgrade from the same service pack. Means can only from
a. "non-SP1 to non-SP1"
b. "SP1 to SP1"
c. "non-SP1 to SP1" is not possible and vice versa
If it’s preinstalled with non-SP1 then you need the non SP1 Vista Installation DVD, or you can upgrade to SP1 using Windows Update beforehand. If yours is preinstalled with SP1 and you don’t have the SP1 disc then you’ll have to somehow get it (you know what I mean).
So let’s get started.
Steps:
1. BACKUP YOUR FILES. Don’t ever blame anyone but yourself if you lose any of your files.
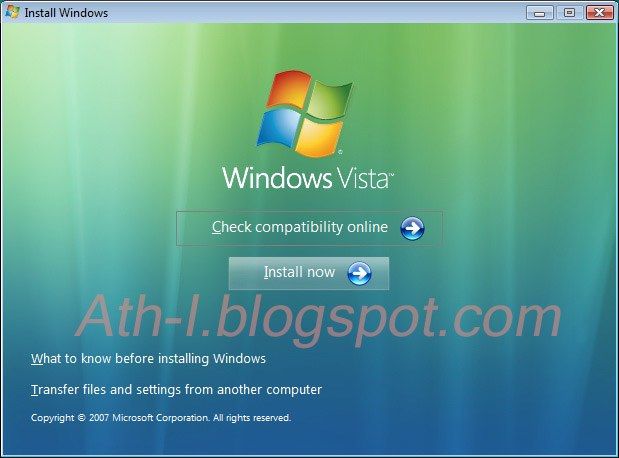
2. Start your Windows Vista and place the Vista Installation DVD. Autorun should popup. If not, run “X:\setup.exe” (x is your DVD drive). Click “Install Now”.
As
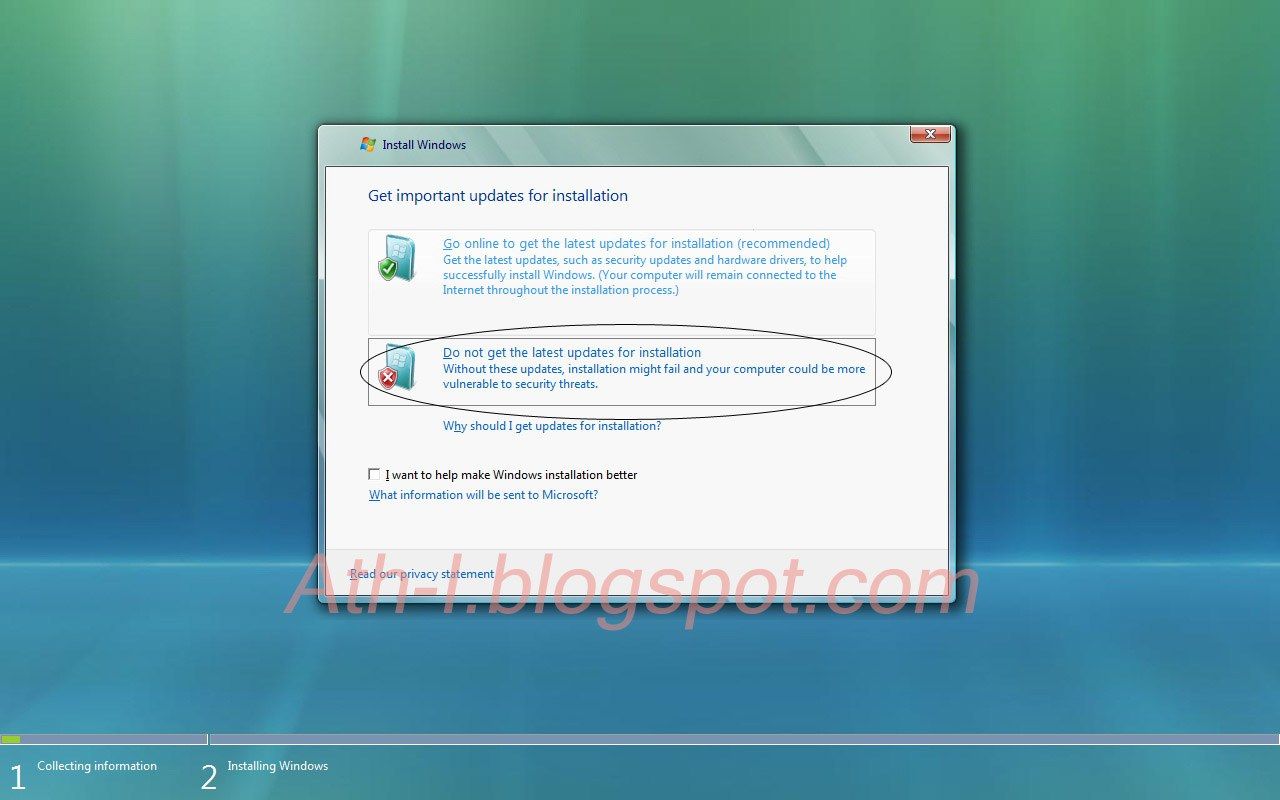
1. As you should’ve update to SP1, just go ahead with “Do not get the latest updates for installation”
4. This step is important. DO NOT enter any product key and uncheck ”Automatically activate Windows when I’m online”. Click next.

5. Click No to confirm not entering any product key in this pop up to continue.

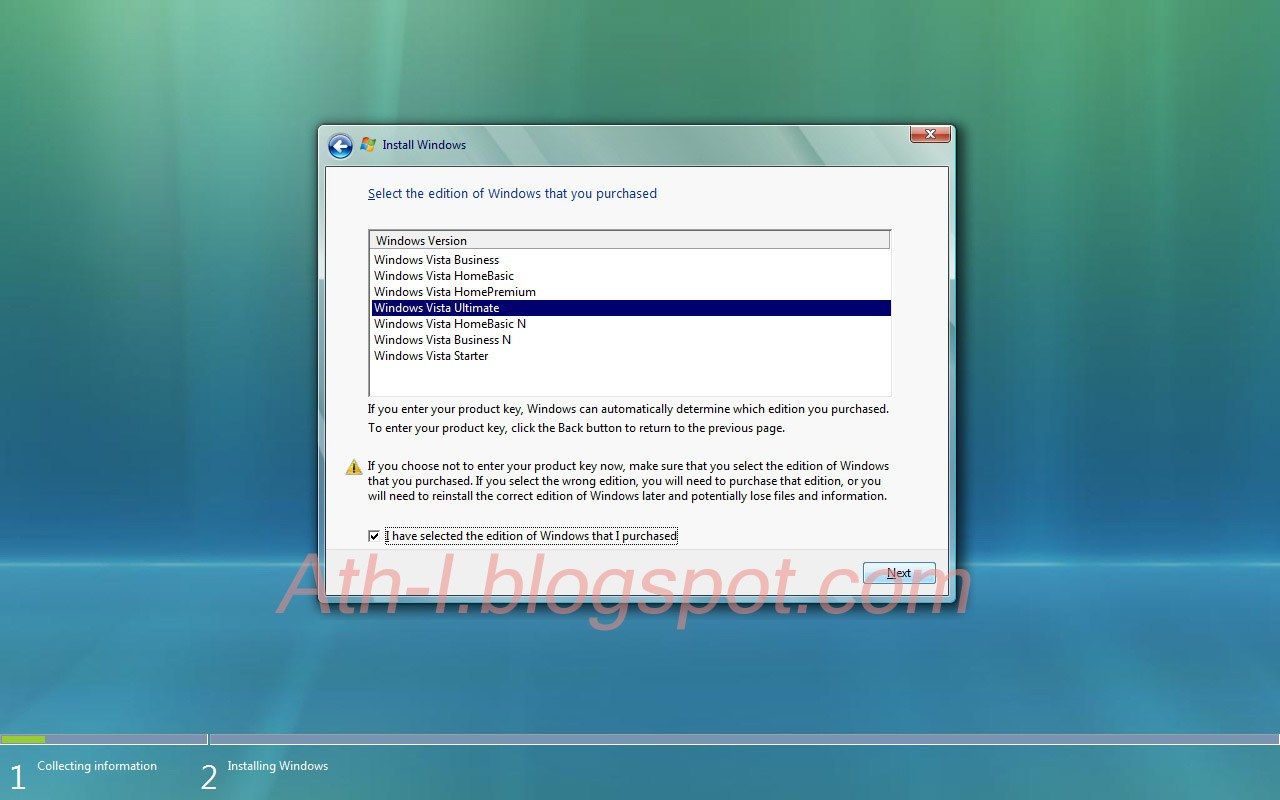
6. Select “Windows Vista Ultimate” and tick “I have selected the edition of Windows that I purchased”. Click next.
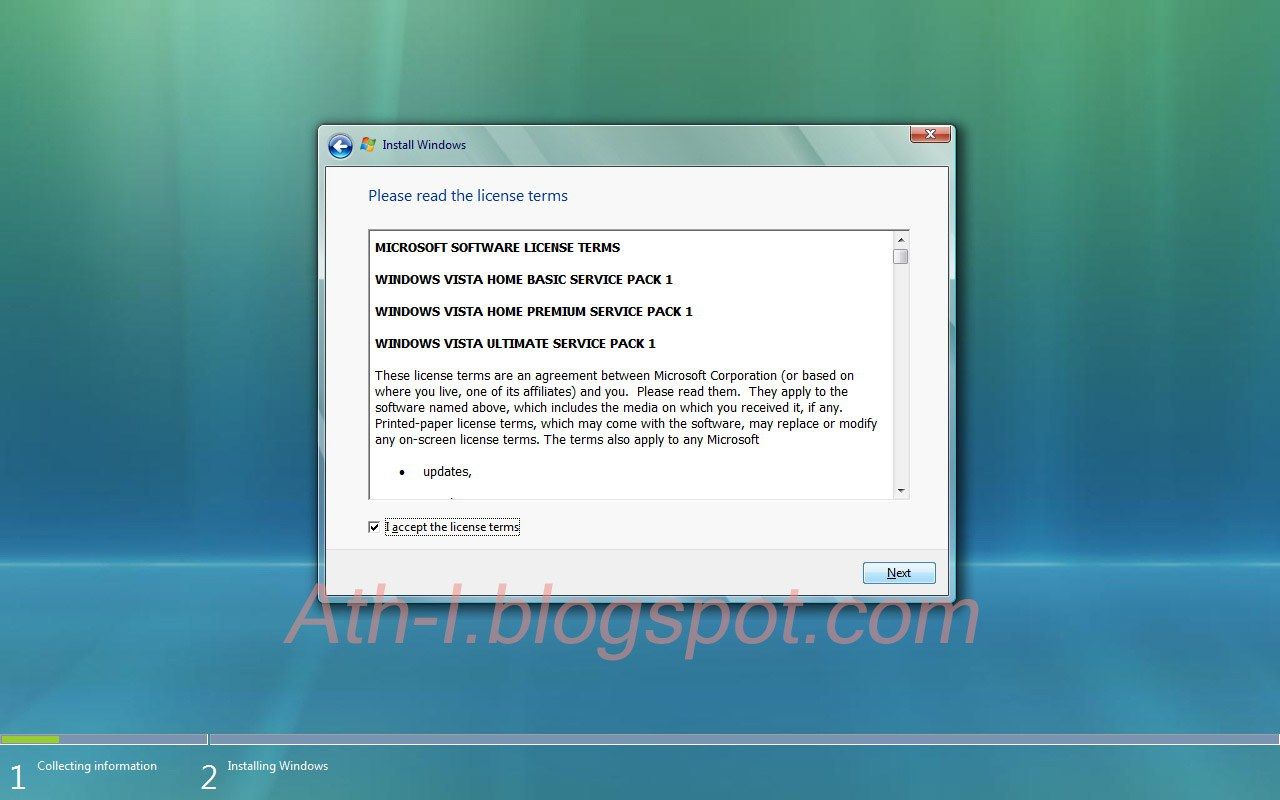
7. Tick “I accept the license terms” and click Next.
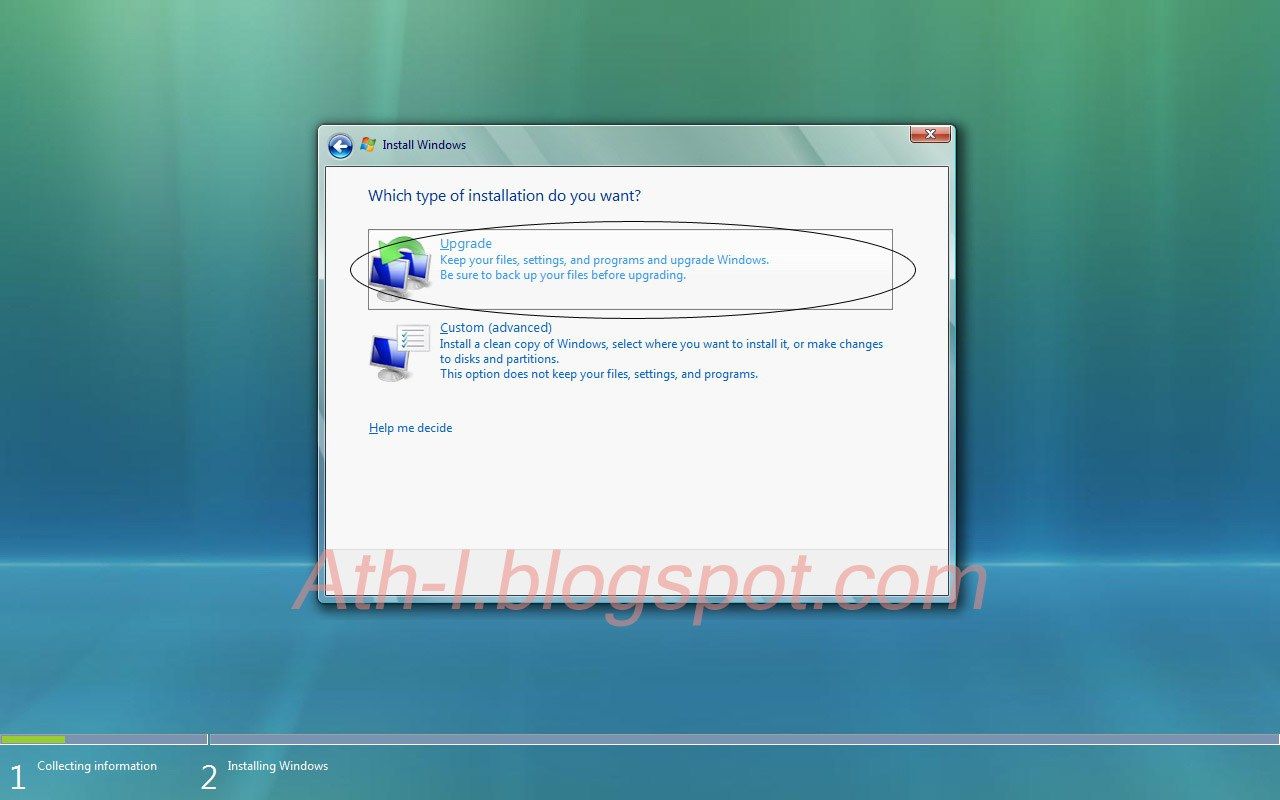
8. This step is the MOST IMPORTANT. Select ONLY “Upgrade”. Custom will do clean install which means format your C: drive.
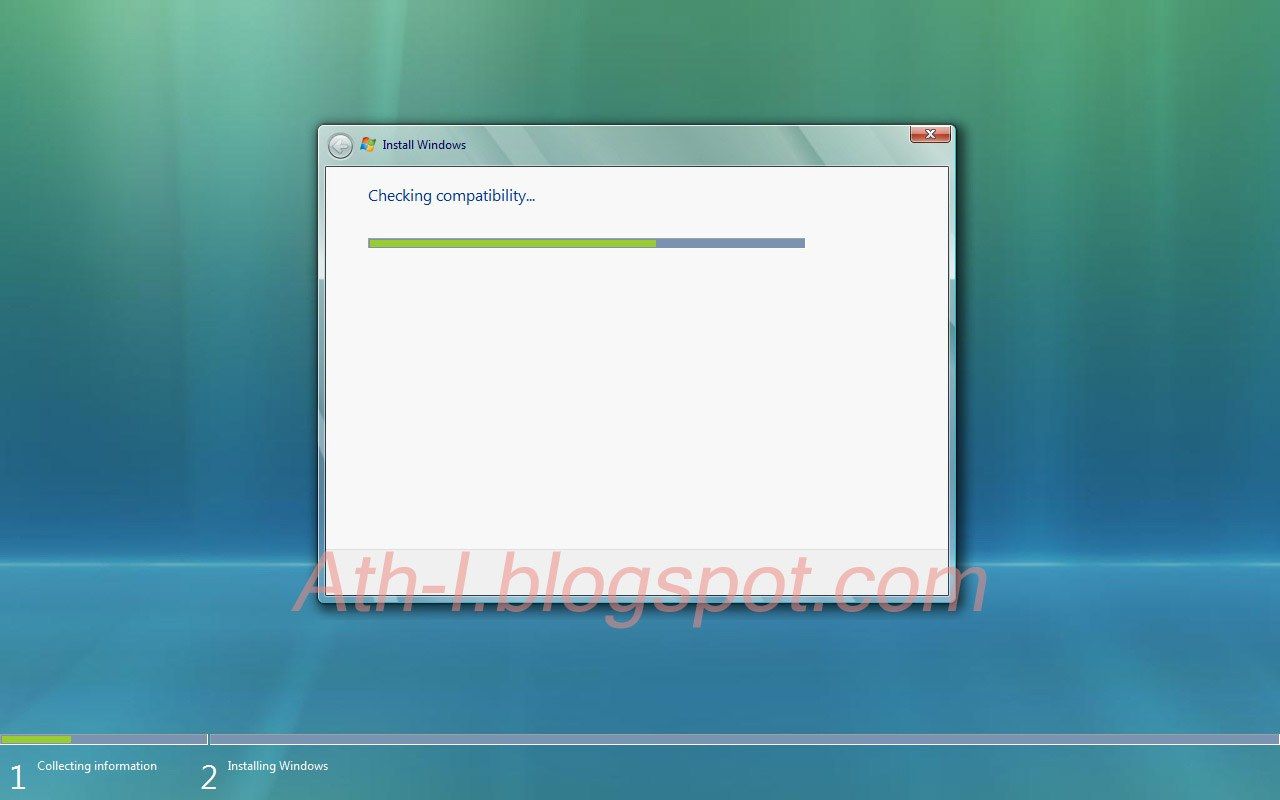
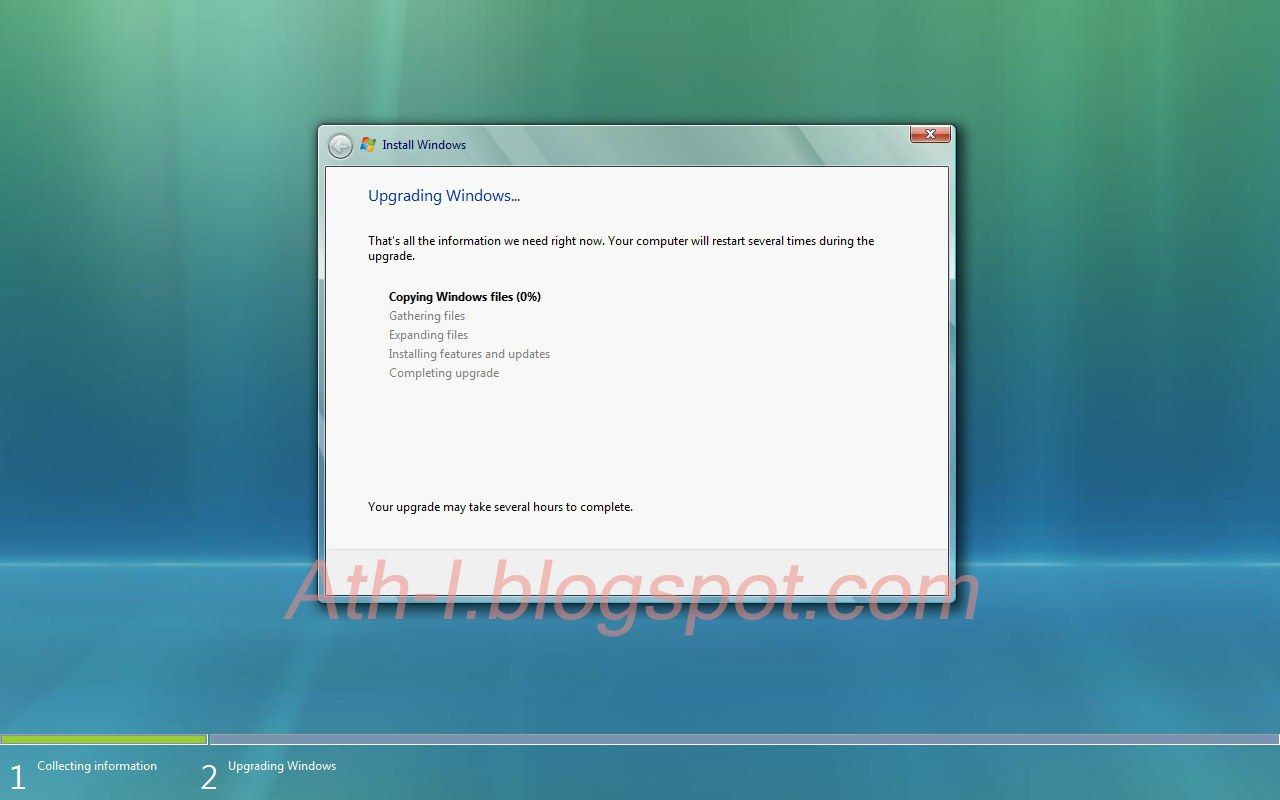
9. It’ll take some time. It’ll automatically restart a few times. It runs automatically unattended. Just sit back and grab a cup of coffee or come back later.
10. After installation is done. You’ll see that you have Windows Vista Ultimate in System properties.
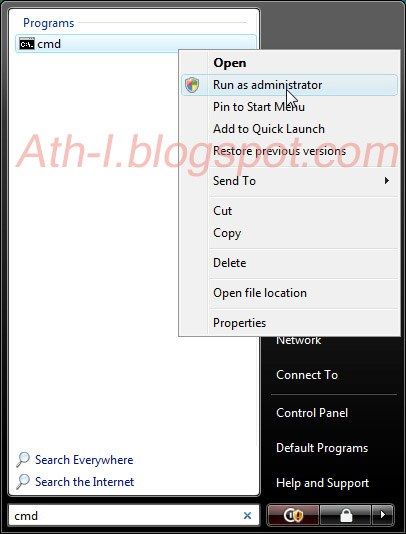
11. Next is to do offline activation. Click start, type “cmd”, then right click on cmd and select “Run as administrator”.
12.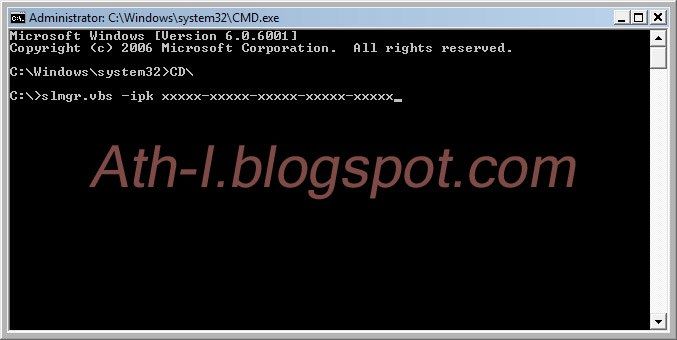
Type according to the screenshot above with Enter after each line:
Type “cd\” then enter.
Type "slmgr.vbs -ipk xxxxx-xxxxx-xxxxx-xxxxx-xxxxx" (where xxx is the 25-character SLP product key, Ultimate version), then press enter.
It might take a few minutes without showing anything but WAIT.
A popup window will say “Installed product key xxxxx-xxxxx-xxxxx-xxxxx-xxxxx successfully” when done.

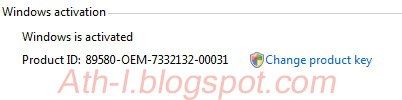
13. Check the System property and it show "Windows is activated".
14. Some of the drivers like graphic card and built-in web cam may need to be reinstalled. Be ready with your driver disc.
FAQ
What is SLP 2.0?
This mechanism referred as 'SLP 2.0' ('system-locked pre-installation 2.0') consists in THREE (3) elements:
The OEM's hardware-embedded BIOS ACPI_SLIC information signed by Microsoft
Toshiba = “TOSQCITOSQCI00?
HEX: 54 4F 53 51 43 49 54 4F 53 51 43 49 30 30
A certificate issued by Microsoft that corresponds to the specific ACPI_SLIC information. Something like 'oemname.xrm-ms'.
And a special SLC product key.
Is the OEM SLP license mechanism a crack?
There is no cracking here; the OEM SLP license mechanism was created by MS and is completely legitimate.
Where do these keys come from?
These keys were retrieved from OEM SLP systems that are being sold by the big OEM vendors.
Do I need to activate my Vista online when I use a OEM Product Key?
Yes, if you use an OEM COA Product Key or any other Retail or Upgrade Product Key
No, if you use an OEM SLP Product Key
Is Microsoft going to black list the OEM SLP Product Keys?
No, these keys have been used by the big brands for thousand of computer with legally preinstalled Vista. If they black list those keys all these legal costumers would be affected too.
Why big manufactures can use OEM SLP Product Keys?
Large OEMs tend to ship large numbers of PCs with Windows preinstalled. The keep the process of installing the OS cost effective. Microsoft has decided that these companies will be allowed to use the some key to preinstall Vista on their units. Also, because of the direct relationship Microsoft has with those OEMS, the company has a higher degree of confidence that a genuine COA will be attached to each PC and that there will be accurate reporting of the number of units shipped preinstalled with Microsoft Windows.
I tried those Vista Ultimate keys here but getting an error saying something like to call Microsoft
for activation?
Well, OEM SLP Key and/or OEM Certificate and/or Full SLIC Table is missing. Or the installed key is not matching your Vista Edition.
How to change the product key?
Launch command prompt window with elevated privileges (run as administrator), then type: "slmgr.vbs -ipk [product key]"
Sunday, May 4, 2008
An Attempt to Upgrade Cowon A2 to 100GB
 To know more about Cowon A2 PMP visit here.
This is actually a rewrite of the original attempt posted at iAudiophile.net forum. In fact, I didn’t post the outcome of the attempt in the original post. So, here goes.
DISCLAIMER: This is not a step by step guide and is not intended for normal 'unadventurous' users to try at home. This is just my project to prove that the ZIF HDD will work in A2. I am strictly not liable for any damage occurred such as your A2 malfunctioned, fire in your garage, the death of your neighbor's dog, rainy days or whatsoever.
The Cowon A2 PMP(portable media player) originally comes in 20GB or 30GB hard drive. These are made by Toshiba. Model: MK2006GAL & MK3006GAL. Both are 5mm in thickness, 1.8”. The form factor of hese drives(size, connector) are the same as in iPod Photo and earlier versions.
 Toshiba MK3006GAL. 30GB.
 Using micro-ATA connector. Same pitch as CF card connector
At the time I planned the upgrade, the largest 1.8” hdd available is 100GB, but 8mm in thickness and different connector(ZIF, zero insertion force). So my plan is to try to fit the 8mm into 5mm space and making a modified connector for the new 100GB drive. TheAt the time I planned the upgrade, the largest 1.8” hdd available is 100GB, but 8mm in model is MK1011GAH. This is a double platter drive and the energy consumption is better than the MK3006GAL.
 Toshiba MK1011GAH with ZIF FFC connected compare to an AA battery.
 8mm in thickness.
To make sure the drive is compatible with A2, I did some “research”.
First is to make room for the extra 3mm.
According to the documentations of the MK1011GAH from Toshiba, there is a metal plate on it that is 0.85mm in thickness. This plate can be removed. So by removing this plate will free almost 1mm. rapidrepair.com has a guide to remove the plate.
 ‘Blueprint’ of MK1011GAH
Between the hdd and the battery(back cover) there is a spacer to hold the hdd in place. The thickness of the rubber is around 2mm. This can be removed by cutting away the part.


So 3mm freed? No quite. More on this later.
The other modification is the connector. As the documentations of MK1011GAH shows, the interface used is ATA. So it’s basically same as the old MK3006GAL. Just the physical connection is different. They are same in pin to pin even though the pin count is different.
Here is the remapping of the pin connections. Courtesy of a guy from misticriver.

So before building the connector, I need some ‘raw’ materials.
1. A connector for the A2 side. Since the connector is the same as of CF card, I harvest one from an old 32MB CF.


2. Flat flex cable to connect to MK1011GAH.

Another thing to worry is that if the A2 will support hdd more than 30GB.
To prove my concept of the whole thing is correct, I try to connect a 3.5” 160GB hdd to my A2.
So I build a cable to connect them both.
 The cable.
 The connector to A2.
 The complete setup.
 Close up of the connection on A2.
Here the screenshot shows the total capacity of the drive.
So this all prove that A2 is upgradable with larger hdd. And my concept is correct.
Conclusion
So all these work out?? The short answer is NO. Why? The drive is simply too thick. The back cover is impossible to close.

 The hdd is at the same level with the ‘ridge’ which is too high.
But, there is at least some good news. The MK1011GAH can be connected and used in A2.


Found this connector at eBay for USD 2.
Actually, I didn’t proceed to build the connector for the Hdd as it is too thick and no point continuing. I only found this adapter recently on eBay and decided to give it a try and it works. The A2 work flawlessly with MK1011GAH and I assume that other ZIF HDDs as well. Although MK1011GAH cannot fit but the new 80GB MK8022GAA most likely will. This is the drive that is used in iPod Classic 80GB.
So for anyone who wants to upgrade they can try. The connector above works but it won’t fit in A2. So you’ll still need to build your own smaller one.
Subscribe to:
Posts (Atom)
